Showing posts with label Reduce Reuse Recycle. Show all posts

Thursday, August 9, 2012

Tutorial: From ice cream pint to pencil holder


Happy Thursday Everyone!  

I've been looking through all of the plastic containers that I have stacked up in the craft room and realized that I really need to use them!  The straight sides of of my Talenti Gelato containers were perfect for this quick back-to-school project, so I hope you enjoy my quick tutorial.

  • Gather together your supplies.  I used: two straight-sided plastic jars, acrylic paint, crayons and Weldbond glue.  I'll talk about cost at the end.
  • Paint your containers and let dry.  Since you will only see the tops of the jars I used, a second coat of paint was applied there.
  • Using a glue that I know will work on both painted plastic and paper, I glued three crayons onto the container at a time.  Make sure the crayons are staying put before applying the next ones as they can shift quite a bit.
  • 33 crayons and 20 minutes later I was done!  Repeat process for additional containers.  To ensure minimal glue drippage, I let the containers dry right side up for 10 minutes and then upside down for an hour.  Weldbond dries quickly and clearly thankfully!
  • Pop your pencils, paint brushes markers, scissors, etc. in the containers and you're set with colorful accessories for any teacher's desk, child's fun time or your own creative area.

Cost:  Everything I used other than the crayons I already had on hand.  I bought the crayons during a back-to-school sale for $0.25 per 24 pack and used just under three packages so my total cost for both containers was just $0.75!

Now on to another container craft... the next one is for Fall, so stay tuned.
Happy Crafting!


Thursday, September 8, 2011

Kid lunches made environmentally friendlier

Several things stuck in my head this summer as we were preparing for the start of school.

Zero trash vs. single serve ease
Keeping strawberries and sandwiches from squishing is soft lunch saks
Cloth vs. Paper napkins
Plastic vs. Metal vs. Fabric containers
Blue goo cooling paks vs.  ????

There are many mind boggling choices available to parents now who opt for making lunches for their children.  Having the summer to think about these things, we bought several new products to test out over the summer to see which would make it into Em and Ro's backpacks.  The following things made it and I'll tell you why they've made it, not only easier, but more economical.

#1-  
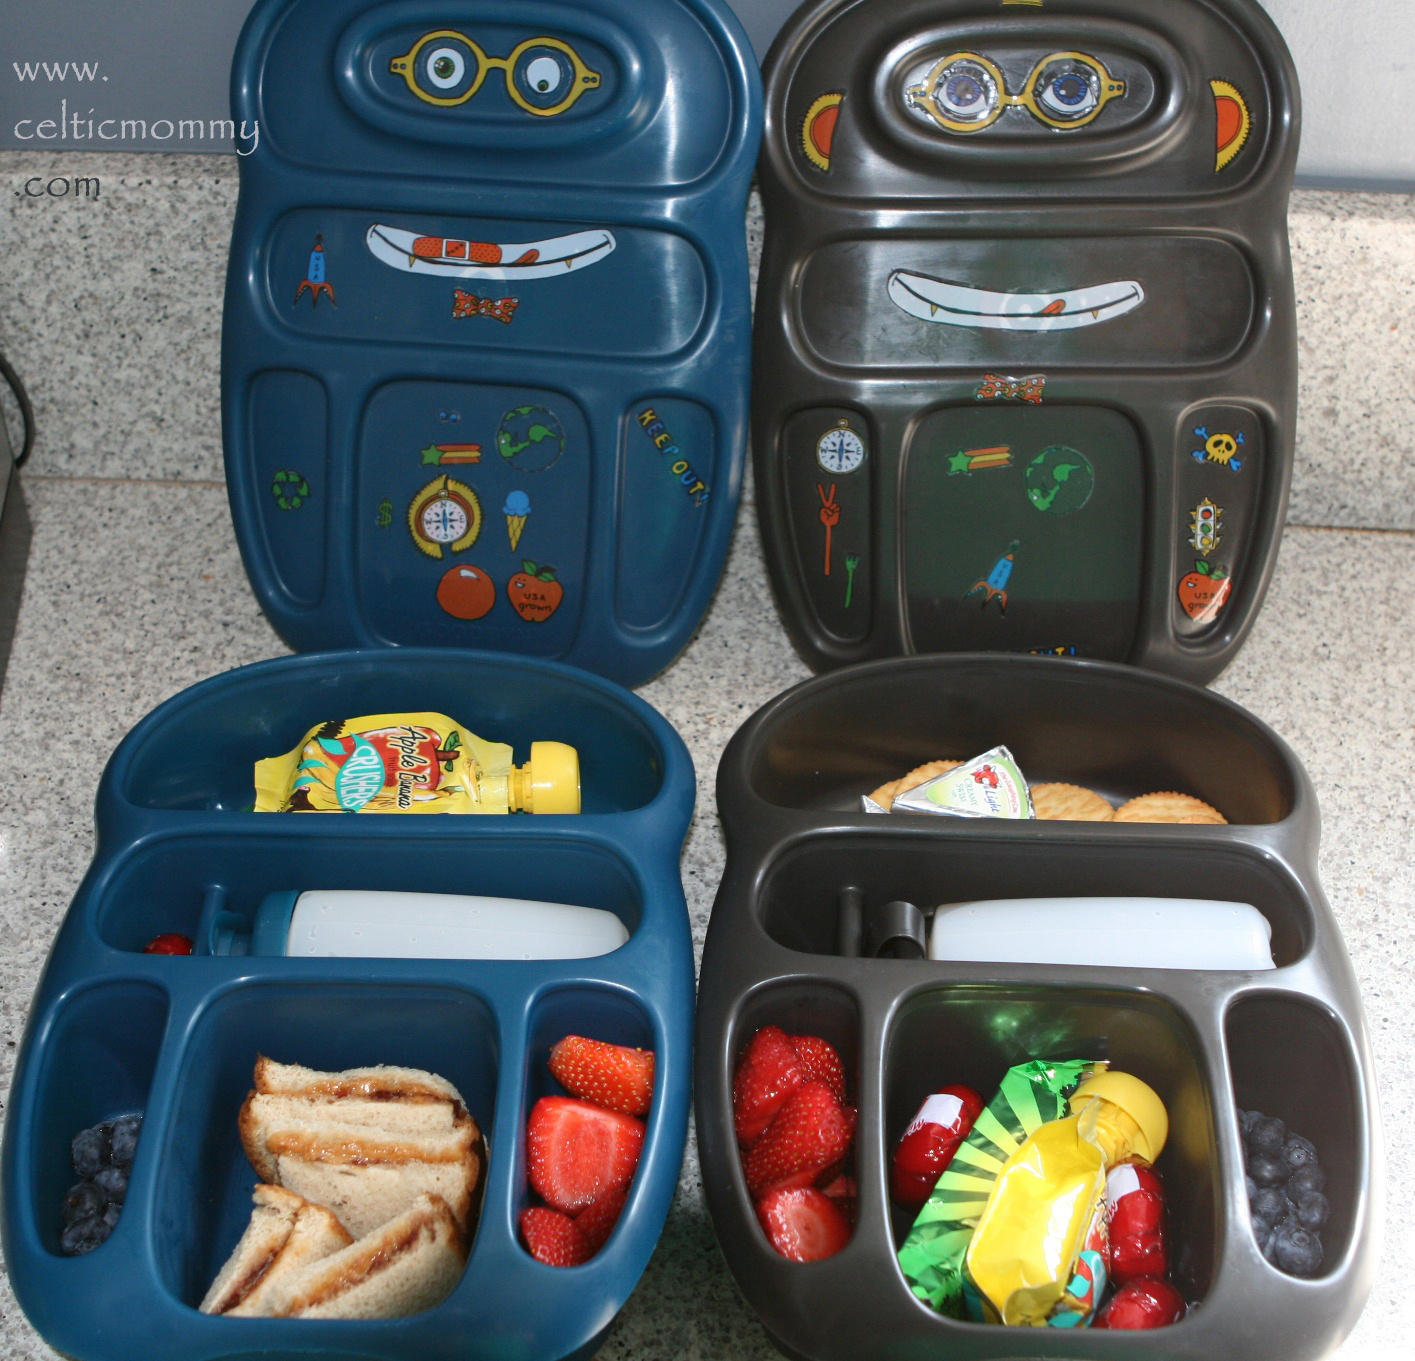
Goodbyn Classic Lunch Boxes.  These are giant fun compartmental containers that Em and Ro each customized with the included nifty stickers.  I love them for their ease of use, washing and recycling and the fact that they do not have the BPAs and phthalates that many parents are becoming more aware of and avoiding.  (Google on BPAs     Google on phthalates)  And, they each come with an 8 ounce bottle for drinks... so much better for the environment than throwaway juice boxes!  The initial purchase is a bit, but buying juice in large containers is cheaper... and no more sandwich baggies chucked in the trash bin... yay environment!

#2-  Flexible and cut-able ice paks.  Made with saline water, these ice packs are made to fit anywhere you need them.  There are many companies that are now making these non-toxic, non-goo chilling options for all different uses.  You can purchase them at Target and online at various places.  (See photo below, I cut one 4x10 cube pak up into 10 strips to use in tight spaces wherever I need them.)  Just one 4x10 cube pak comes in at a reasonable $4.00


#3-  Cloth napkins.  I know... this one may be harder for many who do not sew or craft but I found it silly that we use cloth napkins at home for our meals but was purchasing paper napkins for their lunches.  See the little tree/sheep fabric in the Goodbyn, that's a kid-sized napkin.  I made sets for each of my kids that can be used either in their lunches or at home.  Yes, I do have to check to make sure they are in their lunch boxes when they come home, but Em and Ro are already used to using cloth, so the transition will, I hope, not be difficult.


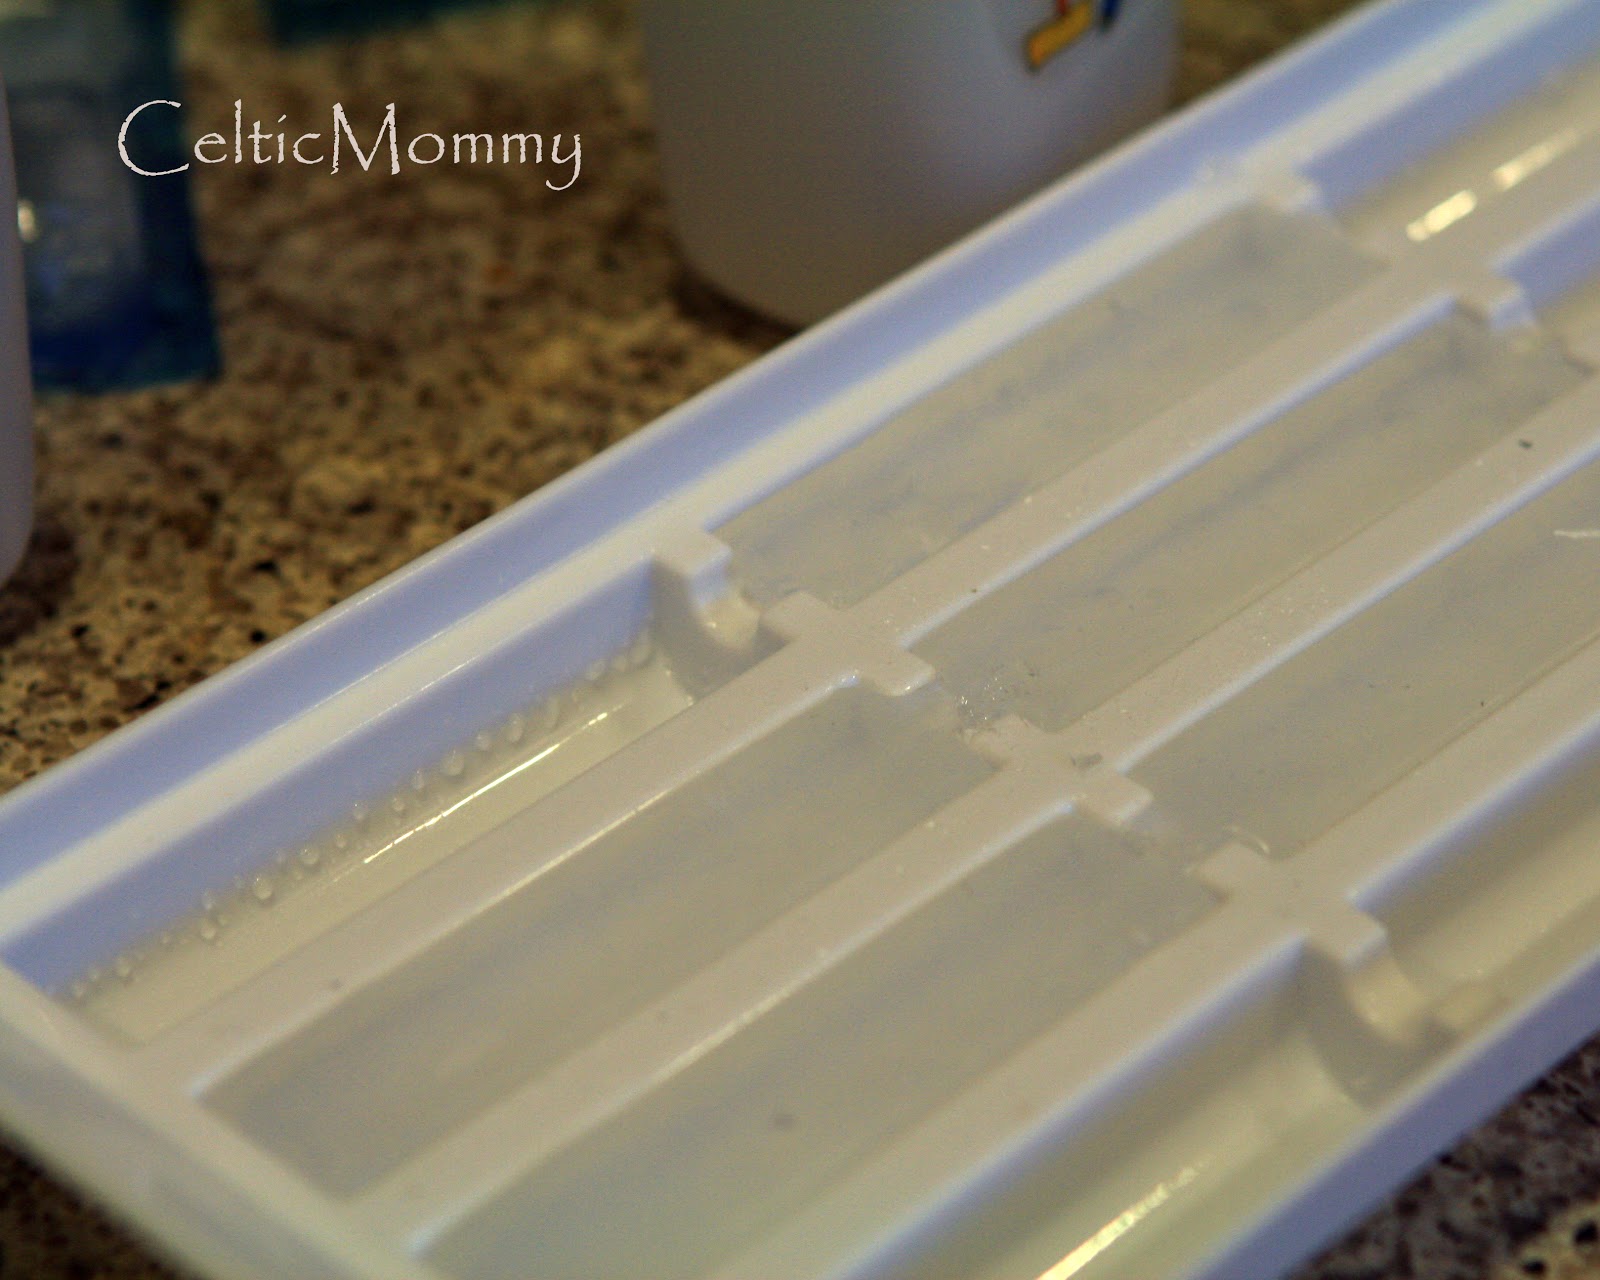
#4-  For keeping drinks cool, I bought a 3-pak of water bottle shaped ice cube trays.  If our pediatrician and dentist had their ways, Em and Ro would only be drinking milk and water, not fruit juice.  At home, we always water down our juice to cut the sugar intake anyway, so adding ice cubes to their lunch drinks is another continuation of what we do at home.  3 of these trays were $4.00 at Bed, Bath & Beyond


So there we go!  We tested out everything over the summer on our supplemental homeschool field trips so that Em and Ro could get used to using the new items.  The lunch boxes passed the falling off the car roof test (while full!) and the being sat on test, so I think we're good to go.

Now, on to keeping what goes inside their lunches interesting.  But that's a topic that needs its' own blog posting I think!

What products could you not live without?  Please feel free to share your ideas!
-Hettie


Thursday, June 18, 2009

Recycling Batteries

A little over a year ago, I cleaned out a glass jar, slapped a little label saying "USED BATTERIES" on it and shoved the jar up into a kitchen cabinet.

Every once in a while, the heavy clink clink of batteries being plunked into the jar would remind the boys about the importance of not throwing old batteries in the garbage.

Clink Clink Plunk - Flashlight batteries replaced

Clink Clink Plunk - bi-annual replacement of smoke detector batteries

On and on this went, the boys now having learned that this is where batteries go for recycling... a little "bin" similar to the outside ones that collect glass, paper and cardboard.

Today, with the replacing of batteries on my old CD player, the jar was full!

So, once full, where do I take them?

Household batteries can be recycled in many easy-to-find places! Listings are an Internet search away. Earth 911 Waste Management Jiffy Lube to name just a few

Teaching my kids this very easy habit will keep them mindful of keeping our planet green & healthy.

Do you have suggestions for recycling batteries or CFL lightbulbs? Electronics? Old paint? Post a comment and I'll add the link!

Sunday, May 17, 2009

Beating the heat and reusing water

In characteristic Southern California fashion, it is already dang hot! The boys and I are outside every morning before the heat and glare of the sun becomes too unbearable... then again in the late afternoon for a bit of water fun. Since Los Angeles is in the middle of one of the worst water shortages in almost 20 years, everyone is doing their part to cut back. You may already remember my keeping a bucket in the shower tip... the swimming pool water gets the same treatment.


Once or twice a week, we fill the kiddie pool about 1/3 of the way up... just enough to keep cool. The boys splish splash while I crochet and photograph the everyday... and when they are absolutely done, they shake off to dry while I break out the watering cans and buckets.

I (sometimes we) make about 20 trips back-and-forth from the pool to water the veggie garden...
from the pool to water my front yard gardenia, sweet pea and azalea bushes...
from the pool to water the orange tree...

Once the heat really hits, the green lawn in the background of these photos will get pretty crunchy but that's just how it goes living here.

Tuesday, July 1, 2008

New crayons!

With two strong-handed boys in the house, crayons often break while we are coloring... but the broken crayons can still be useful. Here's how we've turned potential trash to treasure by recycling the old crayons into new crayons. Projects like this are excellent for kids to sort out the crayons-- and these also make a great gift for children 15 months and up. The molded crayons are usually sturdier than large crayons, last a good long while and are excellent for making leaf rubbings.
Here's how you do it:
  1. Preheat your oven to 275 degrees
  2. Separate broken crayons and sort by similar color
  3. Place crayons in a ziploc bag and, using wooden mallet or meat tenderizer, smash pieces into 1/2 inch or so sized pieces. A regular hammer will also work, but tends to smoosh crayons more.
  4. Put crayon pieces into foil cupcake holders so as not to ruin your pans. Silicone works well also and the molds you can find are many... but I would only recommend using them just for this project and not for food.
  5. Bake crayons for about 11 minutes.
  6. When the crayons look melted but the colors are still intact, take pans out of the oven. Do not stir them to keep the colors.
  7. Let the pan cool for at least two hours.
  8. Remove foil liners from pans and let cool for at least 6 hours to overnight. If using molds, just leave overnight. Unmold the new crayons and start creating!!
If you have oven-proof molds such as this Lego Brick Mold, you can make even cooler shapes!

Monday, June 30, 2008

Recycled Tshirt Purse

About a month or so ago, I entered Woof Nanny's June Purse Project... to make a purse out of old t-shirts. I had originally planned to make an overnight bag for Em, but changed my mind while leafing through this cool Ragwork book by Lizzie Reakes that my mom found at a used bookstore closeout. I took four shirts that were in good condition, but stained, and cut off the sleeves, collars and bottom bands. I cut the remaining fabric into 3/4 inch wide strips and formed gigantic balls of yarn. I cut fabric everywhere I went-- as a passenger while driving to breakfast, while watching the boys in the backyard, while waiting for pizza dough to rise... cutting t-shirts is an oddly meditative thing to do.

Anyway, since I wanted the front and back sides of the purse to match, I made two separate balls: one with the fronts of each of the shirts and one with the backs of the shirts. Then, I used a size P, 11.5mm crochet hook to make the outer bag pieces, each measuring 12 inches wide by 9 inches high.

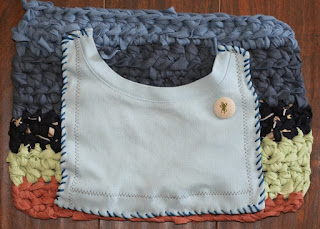
I took another old t-shirt and cut the front off to make a pocket to hold my cell phone. Stitching the pocket onto the crocheted bag piece was not easy... lots of layers funnily spaced. But, this was going to be a fun, recycled crafty bag, so perfection was really never something I wanted to achieve anyway. I added a cute fabric button to the front of the pocket for whimsical accent and then cut the remaining fabric from this shirt into thinner 1/2 inch wide strips to crochet the bag together with a size N, 10mm hook. I added a nice wide strap and a gigantic snap to finish the bag off. Voila a washable t-shirt bag ready-to-use!!

Since Em and Ro are older now, I don't have much use for a diaper bag, and a purse this size holds all the essentials for a quick afternoon out without being too cumbersome. Whaddya think?

Monday, June 16, 2008

Doing and Done... projects for the boys & Christmas

Quick pics of a few of the latest projects...

A new tee for Ro... I found an elephant pic online and modified it for the freezer paper stencil I made and used Folk Art Fabric Paint in taupe. I didn't notice until it was done that the elephant looks similar to this super cute Superbuzzy fabric I just got.
A Christmas gift. (Sarah, don't scream!) A silhouette of a cypress tree... modified to fit on a large t-shirt. This one will have several colors and I'm already excited about how it's turning out!

New tote for Em from more of those Freecycled scraps I got a few months ago. Similar to the tote I just made for me...

Saturday, June 14, 2008

"New" curtain for my kitchen window


Part of my 101 challenges in 1001 days is to "Get or make window coverings for the whole house". Yesterday, I tackled the kitchen window... and it finally has a covering for the first time since the kitchen was remodeled the first time -- 9 years ago! Since the window looks out onto our sideyard (and the 6 foot high wooden fence Rob and his father built), privacy wasn't the concern-- but with summer coming, I am determined to keep the house as cool as possible.


When my friend Mariella still lived here, she was an avid Freecycler like me and we often shared the things she and I got. One Freecycler was giving away several household items and these four panels were part of what I received. I soaked them in baking soda and dried them in the sun to help get rid of most of the stains... then I ironed them and they sat in my breakfront for several months.

After doing the breakfast dishes with a face full of sun, I decided it was high time for some kind of window covering! The four panels perfectly covered the width of the window while also still allowing light in. I hung them simply with some wire and hooks. Then, for a centerpiece I added a green glass celtic knot in the center that I bought in New Hampshire many years ago-- and that's it!


To the bottom right of the window, by the sink, there is an old pewter candy dish that another neighbor was about to throw out! I cleaned it up and use it to hold my crocheted sponges.


One room down and seven to go to complete this part of my challenge.

Wednesday, June 11, 2008

A little of this... a little of that. Recycling at its' best!

So... last night, I was staring at my two giant tupperware containers full of fabric, wondering where in the world I was going to put the Freecycled scraps I still hadn't put away yet... and finally, I figured I'd just make another something-or-other to make the pile a little bit smaller! Tee hee..
In the middle of the scrap pile, I saw this pretty pretty piece of Belle by Amy Butler fabric and felt a yearning for a new tote bag.

Originally, I started thinking about the Artsy Clutch in Amy Karol's awesome Bend the Rules Sewing book... and then diverted to Lotta Jansdotter's book Simple Sewing and her Simple Tote... and then I looked at my super worn out diaper bag for handle ideas.
Since I am working with scraps, I couldn't be choosy about centering the design on the bag and I just worked with it. I found another scrap that matched (woo hoo!) for the lining and added some old coat buttons to the bag for decoration.
For additional strength on the straps, I added a piece of ribbon that an order from Sew Mama Sew came wrapped in and viola... the bag was done!

Not too bad I'd say! Total cost of the bag: $1.50 for the thread. Everything else was recycled or Freecycled!

I'm off to take a walk now with Ro to the grocery store and use my pretty new tote! BTW, I still need to put the scraps away... but I feel happily diverted for the moment.

What do you do with your scraps?

Friday, May 30, 2008

Hello cloth napkins, goodbye paper napkins

As part of my 101 goals for the next 2 1/2 years, a.k.a. 101 things in 1001 days, I made 2 pairs of kid-sized cloth napkins this morning while Em and Ro were exploring nature in the backyard.

Personal goal #87 is to "Convert to a greener household. No paper towels or napkins, greener cleansers." While I still have paper napkins, I am prepping for the conversion.

The four napkins are perfectly sized for my toddler's laps at 14" squared. Typical adult napkins are between 18-20 inches. I found this wonderful 3 little pigs themed cotton/linen blend fabric at Superbuzzy and ran to their warehouse to pick it up. (Side note, that place is super awesome and addictive and Kelly is such fun to talk to!) Since these napkins only took up 3/4 of a yard, I have enough fabric left over to make a few kitchen towels (and maybe a treasure pouch for each kid) and will post them when they're done. Considering how much cloth napkins cost to purchase, the hour or so of love and effort is well worth it... and, having a silly kid theme will hopefully ensure that they are used by my boys!

Today, we'll be continuing the piggy theme by reading the True story of the 3 Little Pigs by Jon Scieszka... silly and smart-aleck author of The Stinky Cheese Man. Perhaps we'll make piggy puppets with paper bags as well. I feel like saying "This blog was brought to you by the letter P!" Silly me.
Tonight's dinner will include Bar-B-Qued pork from one of my favorite cookbooks, The Wisdom of the Chinese Kitchen by Grace Young. Sauteed carrots, jasmine rice and brownies will round out the evening. I hope you all have a fantastic weekend!

Sunday, May 18, 2008

SUNday

Just a quick hello. It's been in the triple digits here for the past few days, so Em and Ro have been making great use of their new little pool to keep cool. I sit and crochet under the umbrella so that I don't pass out while observing their fun.
When they're done for the morning and their skin is "all raisiny", we come inside for lunch and a quick rest. Then, the water from the pool is recycled onto the plants around the house. I talked about a similar tip a little while ago, and it makes me feel better knowing the water is being reused to nurture our little annuals and perennials. Hope your day is going well!

Tuesday, April 1, 2008

Finished blankie

I recently wrote about a Freecycler who graciously gave me 2 1/2 gigantic garbage bags full of scraps and the blanket I was making with some of them. After sorting them out and divvying up the scraps between several on and off continent friends, I set out to finish this fun blanket. Ro is transitioning from "the baby" to a toddler and I wanted to freshen up his room with some new accents. Over the next few months I'll blog about all the ideas as they come to fruition... here is the first one! (click on the pic to enlarge for a better view)The front of the blanket is entirely made with scraps from Angie (a.k.a. The Freecycler) and the back is a big piece of cocoa brown fleece I already had on hand. I used thread from my stash and the love in making it is, of course, free... so the blanket technically didn't cost much! I guess you could say it was about 1.50 for the thread, 1.50 for the gas to pick up the fabric, and .75 for the piece of fleece that I bought out of the remnant bin many months ago. $3.75 in cash but priceless when you add in the doing for the love of your child!! It fits perfectly in his crib-- but it doesn't stay there unless he's asleep. Usually it is with him. I think he likes it!

What do you do with your fabric scraps??

Friday, February 22, 2008

Useless bits given new life

Last week, I got a call from my friend Mariella who is an avid Freecycler like me. She had just gone to a Freecycle garage sale from one of the local members of our group and told me I just HAD to contact this woman... she had fabric!


So I email this woman about the fabric and she writes back, almost apologetically, that all she has are scraps. Bits and end pieces only, not yards or bolts... pieces that usually end up in the garbage.


I race to this woman's house! Being a crafter, a recycler, a reuser and a mommy... scraps are just what a budgeted gal like me covets. When Mariella told me she had fabric, I didn't realize she meant she had three leaf sized bags full-to-bursting with fabric. And nice fabric... I mean fabric I couldn't afford to get. Amy Butler, Japanese, Minky, Michael Miller, Heather Bailey, Moda, Heather Ross... wow!


After three days of sorting through everything, my office floor was overflowing with fabric goodness! I set aside about 10% for me, then Mariella came for 10% and I am giving away the other 80% to crafters I've met online. This "garbage" is now going to various ports in Maine, New Zealand, Arizona, Texas, California, Massachusetts and Ireland. And these crafters are just as excited as I am!


Yesterday, I finally finished the front of a blanket made from some of the scraps (using just 1% of my 10% to give you an idea of volume). This is my first real quilting experience and I was just experimenting and having fun while making a toddler-bed-sized blanket for Ro. I'll do the edges and the back with other fabric I have in my stash. The piece you see is 38 inches by 54 inches and I'll add 6 inches to the top/bottom and left/right.

I have gobs of ideas for all the other great fabric as well and will share them with you when I get to the point where I can see my floor again! A good deal of the minky fabric will go towards my 25 Things for Charity. The cotton will mostly be used on projects from different books I have on plushie-monster creation, ragworking and simple sewing.

Isn't Freecycling the greatest!!!??!!

Wednesday, January 30, 2008

Reusing crayon pieces to make new crayons

A fast project to make new crayons out of the old broken pieces you've got...

1- Seperate broken crayons from intact ones and take off paper.

2- Sort by color and put into foil cupcake holders so as not to ruin your pans.

3- Bake at 250 degrees for about 11 minutes. Do not stir them to keep the colors.

4- Let cool for 10 minutes.

5- Remove from pans and let cool for at least 6 hours to overnight.

6- You now have pretty new crayons for wee ones to play with!

Thursday, January 3, 2008

What are resolutions anyway?

Happy New Year Everyone!

In catching up on so many wonderful blogs these past few days after a two week hiatus, I've noticed that many people do not like to make resolutions. I do. And I keep them... well, most of them anyway. And I think it might be the kinds of resolutions that I make that help me to keep them. So this year, I'm sharing some of them with you-- my 2008 promises to myself and the why's behind them.

#1- This pic is of me yesterday. Note my tiara-- a leftover from treating myself like a Queen at Camp GetAway. In my hand is a giant cup of my favorite mint tea. And on my feet are softening socks and warm booties. The babies are playing in their rooms for a bit and I'm giving myself a mask and listening to music. I never put myself first. I do everything for everyone else (lovingly!) and never take time for me. So this year, I am!

#2- Stop buying magazines. This is a resolution I made many years ago and I actually did not buy a single magazine throughout the entire year. That time, it was for clutter sake that I stopped. This year, it's for the environment. Besides, anything I'd get from a magazine I can find online anyway.

#3- Start a crafting business. In making gifts for everyone this year (over 40 gifts), I realized how much I like sewing, crocheting, painting, photographing and just creating in general. And, with each project, I get better and better. So, sometime in the first 6 months of this year, I'll be up on Etsy or some other site with my own little shop. My mom has her own shop, and makes these amazing works of art, so I am going to try to follow in her footsteps. I already craft every day with my children... so why not give it a go?!?!

#4- Read, read-to and be read-to more! Both munchkins are finding their love of books and I want that love to flourish. There are books all over this house... in every room (including bathtime reading!) except the closet, and I want to promote this lifelong learning and enjoying activity. It's as simple as that.

#5- Two new recipes a week. This is another old resolution that I'm bringing back. As a self-proclaimed intermediate chef and baker, I once racked up a collection of about 350 cookbooks. While I could happily say I've made something from every single one, I knew I didn't need them all. The first time I made this resolution, I either gave to friends, donated and/or sold half my collection! Some were just not my kind of book... some I had a better version of a recipe, some I knew I would never use past that one recipe. And, they went to good places and I don't miss them. But, after becoming a mommy and not having time to research recipes, I've become a little dolldrummish in my cooking. I make the same 20 or so things... and I'm bored, so this will spice things up for me and us at the dinner table.

#6- The last but most certainly not the least is cleaning up. Not in the way you're most-likely thinking though. Cleaning up to me means:
  • Taking a bag to the park and picking up trash while I'm there.
  • Freecycling and donating away the things I no longer "must have" for the sake of having. (And promoting this concept to receptive others.)
  • Watching my water and energy and waste so that the earth gets a little recovery from our family. (All the Xmas wrapping you see in that pic above is recycled = less footprint)
  • Stopping every awful piece of unwanted mail I can! Catalog stoppage, Direct Marketing Junk, Val-Paks I'll never use...
There's more, but I think you get the idea.
Sure, I also want to lose weight and all that... but these 6 are pretty good for me. They're on pretty pieces of paper in a few places throughout the house so I see them daily. By February, they'll become habit and easier to just keep and not resolve to do like a chore.
Do you have resolutions? What are they??

Friday, October 12, 2007

Work in Progress, Em's Halloween Costume

An old pair of sweat pants... A brand spanking new white shirt... A pair of unused shoe laces... what's a girl to make? How about a pirate outfit!!

After much indecision, Em decided that being a pirate was the way to go for this years Halloween costume. The outfits at Party America and Target were not what I wanted, plus the material is shabby and thin (it's a little cold at the end of October) and I figured I could try making an outfit myself. We bought a $3 sword, a $1 eye patch and earring and $6 school uniform shirt and went home to think about how to transform it all.

First off, exhibit A-- the shirt... doesn't it just instill excitement? Think oooohhh, aaah, Pirates of Penzance! I took off the collar buttons and the front of the collar and seam ripped the edges. Then I cut the shirt into a V in the front and made 3 holes on each side for a piece of leather shoelace to run through. I took the buttons off the sleeves also, seam ripped those and the pocket and ran another shoelace through each cuff (1 lace cut in 2 pieces). Sidenote: This is a size 8 shirt, for a 3 year old kid! I was going for the billowy sea air puffing up the shirt type of idea...


A quick run-through in the washer and dryer to fray the newly ripped edges and voila... here's an after shot.
I think I might replace the white buttons with some old bone ones that I have to give it a more aged look.


Next came the pants. I cut the elastic off the bottoms and angle-cut the pants in various lengths up the leg. A pair of chunky shoes and matching socks and we have this! now to get the whole thing on the munchkin for a dry run!

I added a quick sash of a scarf I made recently, gelled up the hair and added the
eye patch. The fake earring hurt, so I think we might abandon that for now. For the actual Halloween night, Em will also have a scruffy beard and chest hair! We're papier macheing a treasure chest right now also (out of the box those shoes came in!

Up next: Old coffee, a spit-up stained t-shirt and first aid materials... what will Ro be?

Wednesday, September 5, 2007

Watering...

I cannot remember when, but some time ago, I read on my blog-friend Shereen's site about putting a bucket in the shower to catch the water that would usually go down the drain and using it for things like watering the plants. I'm talking about the clean, non-soapy water that passes you while standing in the shower... or you know what I mean!

Anyway, I thought that was such a cool and easy green idea! Since we've been having record breaking heat here in Los Angeles, our newly planted gardenia bushes are suffering a bit... so a little extra water would be nice for them. Em saw the bucket filled with water from my morning shower and asked me what it was for. The "reduce, reuse, recycle" motto is very well understood by him, so I explained that rather than waste the water, we were going to reuse it to give the plants a drink... he was immediately excited and jumping up and down and wanting to go out now now now to give the plants the water. "They're thirsty Mom!" he said to me. How could I refuse?


So out we went in PJ's and all to the front door and quenched the thirst of the three plants... he gave them each their share saying "here's some for you, and some for you and some for you" with a big grin on his face!

Just a fun moment to share. Thanks Shereen for the idea! I now keep a bucket in the shower to catch the water but also as an indicator of how long I've been in there.

Friday, August 31, 2007

Reducing global warming, one tush at a time

(My happy munchkin wearing a blue gDiaper)

I first learned about flushable and compostable gDiapers from Sarah, the genius mom behind the Unplug your Kids website. If you've got (or want to have) babies and are even remotely concerned about the environment, you should check out gDiapers-- one of the very first Cradle to Cradle products and also endorsed by Healthy Child Healthy World. Disposable diapers are one of the worst things in landfills... with 50 million used diapers going to landfills DAILY-- and taking at least 500 years to "dissolve".

Once I was on-board as a gMum, I've kept up with the company and have become a go getter (diaper revolutionist) for their company. I just recently got a package in the mail from them to help spread the word about the diapers... see pic.

Now, other than demonstrating the diapers' ease of use to my friends, I can give out coupons, info. and beach balls. (BTW, if you want to try the diapers, I'll mail you an info kit for free!) My neighborhood ladies now all know about, and some actually already have, gDiapers!!

gDiapers isn't paying me for this...and I try not to be preachy about most things... but when I find a product that I think is great, I like to talk about it. Do you have any products you wouldn't want to live without? Tell me about it!

Tuesday, August 28, 2007

Reusing and Not using (lots of links)

For my brother's wedding, I decided to do my hair at home rather than go to a hairdresser for several reasons:
  1. I can do my hair when I want (and with a mom for a stylist, I can actually do it fairly well!) and not deal with finding a babysitter.
  2. I don't have to tip myself.
  3. It's the perfect excuse to buy a new hairbrush!

So, I went to the local drugstore to get a new brush... came home... and then spent 10 whole minutes trying to pry the brush out of its' packaging!


Look at this thing! It's metal and fairly unbendable... and not recyclable. Aargh! What's a eco-conscious gal to do? Well first, I sent an email to Revlon with a short but polite email about the over-the-top packaging. Then I ripped the stickers off and took a look at this metal thingie and noticed it looks a lot like a shi-shi hook you can buy at a place like Pottery Barn or Crate and Barrell. And, it's green... a color well used in this house. So, watch for it to be reused and pics up in the next week or so. My son will be helping me re-use this as a homeschool project when we go over energy use and conservation.

My second find came from a friend. I had been looking for an indoor drying rack that was portable and could hold more than one load of laundry... I couldn't find anything I liked until I was visiting my friend one afternoon. She had these awesome drying racks that she had brought over when she moved from Germany. But I couldn't find them anywhere here in the States... then I found one for SEVENTY FIVE DOLLARS! Ridiculous.

Fast forward a month... I am at Ikea buying trains for Em and what do I spy??? There is my pretty drying rack for a mere $17.00! It folds up to fit in a closet or under a bed, but it's usually at home in the afternoon sun in my dining room as you see here. Now, I only dry about 1 or 2 loads out of the eight loads of laundry I do every week! Woo hoo!

Are you a recycler? A re-user? A reducer? Do you worry about the planet? What do you do?

Wednesday, July 18, 2007

Reduce, Reuse, Recycle (a bit of a rambling blog)

My journey of going from ~to~


I just finished wrapping up some books for PaperBackSwap, tossed a few bags of clothes in the car to donate to my local charity and put a bag of items outside for someone to come pick up from Freecycle. I am hooked on lightening/sharing my load and have never been happier!

Once upon a time, I was a big buyer/hoarder/keeper. I would not call myself a pack rat because I gave things away often... but only to replace them with other things. My closets, drawers and countertops were always organized but full to the brim. If someone needed a kitchen gadget, a how-to book, a sewing pattern, a music CD, a DVD, craft supplies, a certain color shirt, etc. etc., they could always borrow it from me! When I was pregnant with my first son, it got worse, to the point that I would call it an obsession. My sons' baby clothes drawers and toy chests were full months before I had him or even the furniture to put the clothes and toys in. I had bought clothes, books and toys all the way up to age 2!

After Em was born and then further when I became a stay-at-home-mom/woman/wife, budgeting became an absolute necessity. I started really looking at the what and why of buying things. When I was pregnant with my second son, construction began on my home, causing me to move many things and store them while work was being done. This made me start to look at what I already had and question if I really needed it.

I started donating to my local charities and public library and eBaying other items that I no longer felt the urge to keep. Some of it was easy, some of it was really really hard... but it has all been worth it. There is more breathing room, playing room and living room in my home now. The items I've kept are items I need, use and cherish.

I'm not perfect in this system, there are some things I cannot bear to part with even if they are rarely if ever used. My cookbook collection has gone from 250+ books to about 125 or so... but I do use them! My kitchen gadget collection is smaller, as is the wardrobe in my closet, but I know where it all is and can find things in a pinch. When Ro was born, the fourteen large Tupperware containers full of rarely-used baby clothes and toys from Em came in handy... but as he outgrew things, I did not keep them. Most of the toys went to a daycare center and most of clothes went to many friends and charities. I've kept a few precious items for each of them and gotten rid of the rest!

If I need something, I buy what I need... I am not a squirrel who has to make due with what he's got for the entire winter... if I need more, I'll get more. But, I don't always need more!

This system has also worked with my older son, now three. Before, when he had so many many many toys, he did not really cherish them. A few months ago, we had an afternoon of toy purging. Any toy that was too loud was donated (without batteries to prevent ear damage!), and other toys he was no longer interested in were also donated or kept for when Ro is older and can play with them. A personal decision on quality of toys and their ability to teach things (skill builders, language, dexterity) helped weed out the selection as well. Each munchkin has a smaller toy selection, but each toy is played with... and cleanup has become much easier! Some people cannot believe I've taken toys away from my boys... usually the same people who cannot believe I've taken the TV away... but only my and my husbands' opinions matter and we believe we are doing what is best for our children.

Okay, so why all the rambling on? I don't know. I just thought I would share how it works for me, and hopefully, some of what I have gone through will help someone else to finally tackle their clutter.