Showing posts with label Crayons. Show all posts

Thursday, August 9, 2012

Tutorial: From ice cream pint to pencil holder


Happy Thursday Everyone!  

I've been looking through all of the plastic containers that I have stacked up in the craft room and realized that I really need to use them!  The straight sides of of my Talenti Gelato containers were perfect for this quick back-to-school project, so I hope you enjoy my quick tutorial.

  • Gather together your supplies.  I used: two straight-sided plastic jars, acrylic paint, crayons and Weldbond glue.  I'll talk about cost at the end.
  • Paint your containers and let dry.  Since you will only see the tops of the jars I used, a second coat of paint was applied there.
  • Using a glue that I know will work on both painted plastic and paper, I glued three crayons onto the container at a time.  Make sure the crayons are staying put before applying the next ones as they can shift quite a bit.
  • 33 crayons and 20 minutes later I was done!  Repeat process for additional containers.  To ensure minimal glue drippage, I let the containers dry right side up for 10 minutes and then upside down for an hour.  Weldbond dries quickly and clearly thankfully!
  • Pop your pencils, paint brushes markers, scissors, etc. in the containers and you're set with colorful accessories for any teacher's desk, child's fun time or your own creative area.

Cost:  Everything I used other than the crayons I already had on hand.  I bought the crayons during a back-to-school sale for $0.25 per 24 pack and used just under three packages so my total cost for both containers was just $0.75!

Now on to another container craft... the next one is for Fall, so stay tuned.
Happy Crafting!


Monday, April 12, 2010

It's a Lego Party!!

Many of you may know that my kids' birthdays are just days apart... and fortunately, they are close enough in age to not mind having a joint birthday party. This year, the chosen theme was Legos! Oh yay, Legos!!

Oh no, Legos!!

One of the great things about having a Lego party, is the lack of supplies available. You can't just walk into your local party store and buy Lego plates and Lego napkins and order a Lego cake and Lego balloons. There are a few Lego theme specific items out there, but not much. This proved to be a fun crafting challenge for the boys and me.

First of course, were the invites which I covered in a blog below, but what then? Googling Lego parties brought up LOTS of resources and I looked at as many as I could and began formulating ideas. By the end of very long evening of sitting at this desk, I had a plan! Here is what I did.

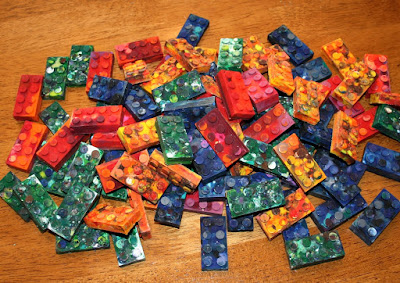
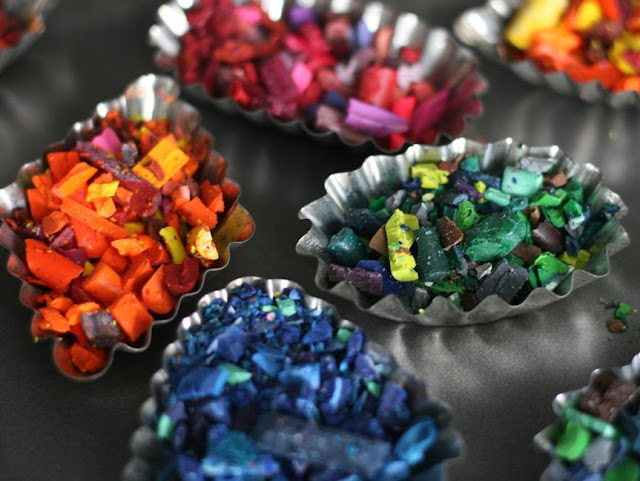
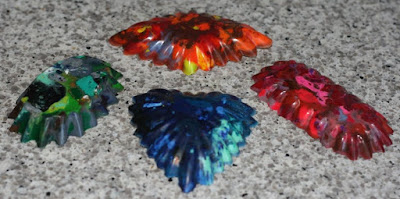
#1- I wanted to make Lego crayons. Having made molded crayons in the past, I knew this would be a great activity to do with the boys. Originally, I had planned to make my own Lego molds like SFHandyman on Instructables, but found out that my local Lego store had molds. As much fun as it would be to make my own silicone molds, I knew I might run out of time, so I went with pre-made molds instead. I made sets of four crayons each for each goodie bag and kept on plowing away at my other ideas.


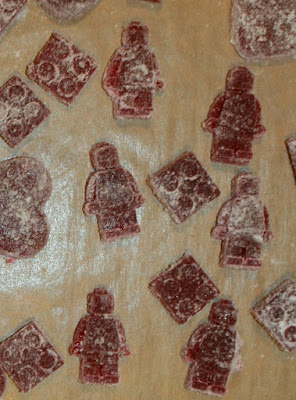
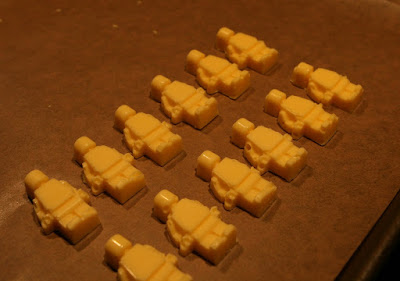
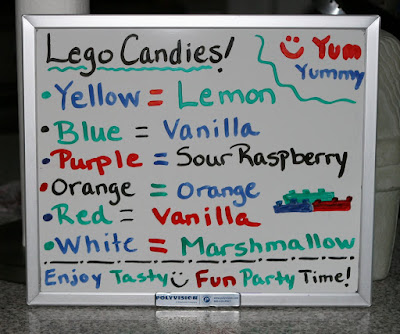
#2- I wanted to make Lego candies. Using the same molds, I made lemon, orange, vanilla and gummi sour raspberry Lego blocks and Lego mini figures. The sour gummi recipe was from The Ultimate Candy Book and were a cinch to make. I wish I had made more! The lemon, orange and vanilla candies were made with Boyajian oils. Since I could only make 28 candies at a time, I was able to make a variety in the week prior to the party. I added homemade marshmallows to the candy tray since they look close enough to bricks as well. (On the marshmallow recipe, I double up on the vanilla!)

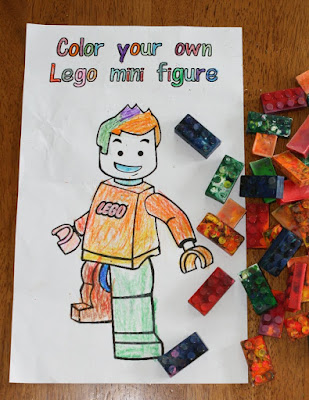
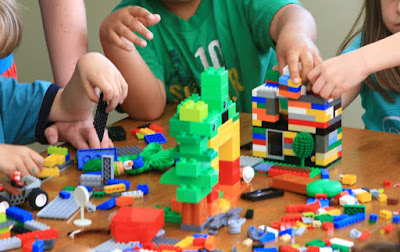
#3- We needed some Lego themed entertainment at the party. In addition to a bouncer, I wanted to have our Legos out to play with... this is after all a party for 4 and 6 year olds. But, not everyone is in to Legos, so I also made a coloring page. I found this cute doodle made by Ryan at Doodle Masters and changed it into an outline to color. Another free font for coloring and I was set with coloring pages.

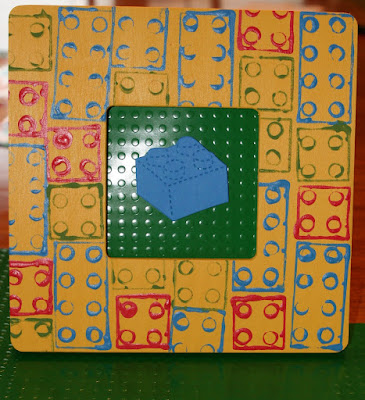
We also had a Lego tower building contest... whichever party-goer made the tallest tower, went home with this Lego frame, made with a wood frame from Michael's that I painted and stamped the same as the invites.
#4- We needed decorations! Rolls of crafting paper have so many fun uses! I made two 2 1/2' by 12' long signs saying "Happy Birthday" and one of my kids' names. We hung these with primary colored streamers in the house. Our outdoor speakers piping Dan Zanes and a bubble machine helped add atmosphere to the back yard.

#5- We needed to make goodie bags! Again, the lack of Lego branded items worked in my budget-minded favor here. I bought these bags on sale at Michael's and then customized them with each party guests name. Actually, I shouldn't say "I" because both Em and Ro helped with this as well. We cut card stock into 1 inch strips, added the foam letters, and then affixed each name with Zots 3D dots. A few more treats and a thank you tag for each bag and we were set to go.

I think that is about it on how-to and steps and resources. If you have any questions, please feel free to ask. Everything I made was for personal use only and never sold... I just need to make that clear for the Lego legal side of things. :-)

Happy Lego Parties Everyone!

Tuesday, July 1, 2008

New crayons!

With two strong-handed boys in the house, crayons often break while we are coloring... but the broken crayons can still be useful. Here's how we've turned potential trash to treasure by recycling the old crayons into new crayons. Projects like this are excellent for kids to sort out the crayons-- and these also make a great gift for children 15 months and up. The molded crayons are usually sturdier than large crayons, last a good long while and are excellent for making leaf rubbings.
Here's how you do it:
  1. Preheat your oven to 275 degrees
  2. Separate broken crayons and sort by similar color
  3. Place crayons in a ziploc bag and, using wooden mallet or meat tenderizer, smash pieces into 1/2 inch or so sized pieces. A regular hammer will also work, but tends to smoosh crayons more.
  4. Put crayon pieces into foil cupcake holders so as not to ruin your pans. Silicone works well also and the molds you can find are many... but I would only recommend using them just for this project and not for food.
  5. Bake crayons for about 11 minutes.
  6. When the crayons look melted but the colors are still intact, take pans out of the oven. Do not stir them to keep the colors.
  7. Let the pan cool for at least two hours.
  8. Remove foil liners from pans and let cool for at least 6 hours to overnight. If using molds, just leave overnight. Unmold the new crayons and start creating!!
If you have oven-proof molds such as this Lego Brick Mold, you can make even cooler shapes!

Wednesday, January 30, 2008

Reusing crayon pieces to make new crayons

A fast project to make new crayons out of the old broken pieces you've got...

1- Seperate broken crayons from intact ones and take off paper.

2- Sort by color and put into foil cupcake holders so as not to ruin your pans.

3- Bake at 250 degrees for about 11 minutes. Do not stir them to keep the colors.

4- Let cool for 10 minutes.

5- Remove from pans and let cool for at least 6 hours to overnight.

6- You now have pretty new crayons for wee ones to play with!