Friday, February 25, 2011

100 Ways to Praise Your Child

I found this wonderful list on Melissa and Shelley's website Stockpiling Moms and felt it must be shared!  I decided to make the list into a 8.5 x 11" printable page so you could print it out and post it on your fridge or other easy-to-view spot in your home.  Simply click on the "photo" and save it to your desktop to print.


Have a great weekend everyone!

Tuesday, February 22, 2011

A San Fernando Valley Winter Day


Good Tuesday morning all!  The promise of rain is later in the week... for now we have gorgeously clear blue skies and some amazing Winter light!  These photos were taken by my amazing hubby at Balboa Lake in Van Nuys, California.

Wishing you all a wonderful day.

Friday, February 18, 2011

Yum Yum Crouton Recipe

I am slightly, slightly addicted to the croutons and crisps sold at Trader Joe's.  Sourdough bread, oven toasted with garlic and Parmesan cheese... the simplest of yum yum yummyness!  So, what's a gal to do when the craving for these hits when home with two sleeping munchkins?  Make my own of course! 

While I am sure there are plenty of recipes both in my library and on the internet that I could follow, I felt this was something I could pop together quickly, so here is what I came up with.

Ingredients:
  • Sourdough bread, cut or torn into 3/4 inch squares-- about 2 cups
  • 3/4 cup freshly grated Parmesan cheese
  • Garlic, smashed, lots of it
  • Olive oil
  • Salt & Pepper to taste
Directions:
  1. Preheat oven to 350 degrees
  2. On a cookie sheet with a Silpat or parchment paper, spread out bread
  3. Drizzle olive oil over bread and toss with hands to coat
  4. Spread out garlic and Parmesan and toss again
  5. Bake for 7 minutes, take out and toss
  6. Bake for 7 more minutes, take out and test crispiness.  If needed, bake 2 or so additional minutes.
  7. Season to taste with salt and pepper
  8. Try to let the croutons cool long enough to make it onto your salad!

On a silly but important side note:  Since Em and Ro were sleeping while I was having fun in the kitchen, I took at least 35 photos of the steps I took to make the croutons.  I'm practicing my food photography techniques and find that I am seriously lacking.  Horribly seriously.  ;-) 

My desire to improve this and other topics on the CelticMommy blog have landed me as an upcoming camper to Camp Blogaway... a boot camp for food and recipe bloggers.  I have not added many recipes on here because the photos for my food are just not as pretty as I would like... so, "Camera Mastery: settings, white balance" is one topic I will be sure to be early for at camp.  Admittedly, I am also excited to meet my fellow foodies who obsess over their own recipes and ingredients.  Soon, I will have figured out how to style my food like a model is styled for their photo shoot!

I hope you have a great weekend!

Thursday, February 17, 2011

Convalescing

Em is home sick... cranky and coughing.  So we convalesce and we craft.  Warm cherry tea with honey and a popsicle stick creation for him.  Cake baking and crocheting for me.

Back tomorrow! 

Wednesday, February 16, 2011

These rainy days

It is a gorgeous, rainy, wintry day here in Los Angeles!  Our whole family loves experiencing the rain and I can count the seconds, literally, from when Em and Ro see the rain outside, to the question of "Is it time for our rainy day observation walk Mommy?"  This type of nature walk never seems to get boring. 

Em, 2005, Waiting to go out and play in the rain.
We watch for the rain.  We look at the cloud types and ponder when the rain will strike.  Will there be enough rain for listening?  For tasting?  Can I stomp in puddles yet?  Are the streams of run-off enough to conduct races between twigs and leaves?

Ro, 2011, Waiting to go out in the rain!
The sun is peeping through the clouds right now... I hope it takes a break and the rain comes back soon!  We've been taking these walks since before this blog began and probably will continue through our lifetimes. This makes us happy.  What makes you happy?

Monday, February 14, 2011

Chocolate Math

Happy Valentine's Day!

Having lots of Hershey's Kisses in the house has brought fun learning activities for both my 4 year old and my 6 year old!
For the four year old:
Patterns made with the kisses, which color comes next?
Grouping kisses by color, estimating kiss count, counting kisses
Single digit addition and subtraction... obviously, subtraction was a very popular aspect!


For the six year old:
More complex pattern making of kisses
Counting kisses by 2's, 4's, 5's and 10's
Double digit addition and subtraction
Group estimation

We love fun little games like this to keep them thinking.  This is, in part, what we call Supplemental Schooling.  Both Em and Ro attend school outside the home, but we supplement their education at home with extras that we want to share and expand on.  It's not exactly homeschooling or unschooling so, we use the term "supplemental schooling" to fit the bill.

I hope everyone has a sweet Valentine's Day!

Sunday, February 13, 2011

Valentine Magnets - Photo Tutorial

I don't know if I would call it a tutorial... but there we go.  The heart stamp was homemade with supplies from Dick Blick and hubby's wine cork!  Everything else is from Michael's.  Nearly all kid-made!  (Mommy made the stamp, printed the labels and cut the scrapbook paper into squares.)
 
Paint wooden disks
 
Watercolor paint Avery labels and let dry.  Leave under heavy books after dry to stay flat overnight.

   Glue magnets and let dry overnight

Print something cute on Avery labels and punch out to use as seals for each Valentine.

Heart stamp, or whatever you choose on magnet faces... this was easy for Em and Ro to make many at a time without having to hand painting hearts on.

Truly the most awesome tip... the magents on a cookie sheet STAY STILL for little ones to stamp without having to touch them!  Less boo boos this way.

Cut 12x12 scrapbook papers into 4 6x6 squares.  This was inspired by Unplug Your Kids February topic "Page".  Used this Google Image Search to inspire the boys to make their own envelopes.

When magnets are dry, put in center of envelopes and re-fold.

All sealed up and ready to give out!

Happy Valentine's Day!

Saturday, February 12, 2011

Free crochet pattern: Rib wrapped cap for children

Rib-wrapped toddler and kid cap

Designed by: Heather Schott (CelticMommy on Ravelry. Ravelry pattern link)
http://celticmommy.blogspot.com/

I originally made this as a hat for preemies, newborns and babies but have gotten such a wonderful response on it, that I modified the pattern and edge trim for toddlers and children.

This hat is a bit stretchy and fits nice and snug for a warm layer in the chilly months.

As with my other free patterns I have offered, this is free for personal use only. The pattern can be made for gifts, charities, etc., but not for sold items!

Materials Needed:
• For a toddler hat: About 75 yards worsted weight washable yarn and a 5mm (size H) hook. (Fits 2-4 year olds) You could also make it with a DK weight yarn, same hook for a smaller hat.
• For a child sized hat: (Fits 4-12 year olds) About 85 yards worsted weight washable yarn and a 5.5mm (size I) hook.
• Needle to weave in ends

The hat shown in the pattern was made with Blue Sky Alpacas Organic Cotton, the Mediterranean colorway.

Pattern:
Chain 3
Round 1: In first chain, crochet 13DC. Join with a ss to top of the chain 3 (makes 14 sts total)
Round 2: Chain 2. fpdc then dc in each stitch. Repeat all the way around. Join with a ss to top of chain 2. (28 sts)
Round 3: Chain 2. fpdc in each fpdc, dc in each dc. Repeat all the way around. Join with a ss to top of chain 2. (28 sts)
Round 4: Chain 2. *fpdc in fpdc. 2dc in each dc* Repeat all the way around. Join with a ss to top of chain 2. (42 sts)
Round 5: Chain 2. *fpdc in fpdc. dc in top of same fpdc. dc in each dc* Repeat all the way around. Join with a ss to top of chain 2 (56 sts) SEE PHOTO below for more info on this round.
Round 6: Chain 2. *fpdc in fpdc. dc in each dc* Repeat all the way around. Join with a ss to top of chain 2. (56 sts)
Rounds 7-14 for toddler, 7-15 for child: Repeat round 6
Round 15-17 for toddler, 16-18 for child: Ribbing. SEE PHOTO below for finished detail. Chain 2. *fpdc in fpdc. bpdc in dc. fpdc in dc. bpdc in dc.* Repeat from * to * all the way around. Join with ss at end of row. Weave in ends.
Please let me know if you have any questions, comments or spot any errors.

If you make this cute cap, I would appreciate a link back to the pattern either here on the blog or on Ravelry so others can use it as well.  Happy Crocheting!

Wednesday, February 9, 2011

Calming Bath Soak Tutorial

For the past week, I've been conducting a poll over on my sidebar on how many baths my readers take and apparently, we take a lot of baths!  For Em and Ro, evening bath time is fun but also a time to calm down and prepare for bed.  This calming bath soak recipe and tutorial is not just meant for children, but it is so easy, a four year old can make it!
Ingredients and Supplies: 
3 cups Epsom salts
1 cup dried chamomile flowers
1 cup dried lavender flowers
1 cup rolled oats
Food Processor
(optional) Reusable Large Cotton Muslin Bags

The muslin bags, chamomile and lavender, I purchased from Mountain Rose Herbs.  The oats are Bob's Red Mill.  As my munchkins and I have sensitive skin, I opted for all organic ingredients.  If you have a Whole Food's, a Henry's or other bulk store in your area, you can purchase there if you choose to.

How to make the bath soak:
1-  Dump all ingredients into a food processor
2-  Process ingredients for about 1-2 minutes.  If you have a little one wanting to help out with this project, they can use the PULSE option on the processor... it makes mine giggle and he also feels like he is really helping out.
3-  Pour contents into a container with a tight seal.
Using the bath soak:
This blend is pretty potent, so you only need about 1/2 cup for children (who use less water) or 1 cup for adults.  If you do not want your bath time experience to be like floating in a cup of chamomile tea, I would suggest using the optional reusable muslin bags. 
When your bath is done you or your little ones will be nice and calm and ready to rest.

Happy Bath time!

Sunday, February 6, 2011

Relaxin'

The wind seems to have kicked up ticklish dry coughs and sniffles in the household... today is meant for relaxin'!

The dining room table has been taken over with pencils and tape and paper and books and yarn and glue and... and... all that good stuff.

I'm reworking and resizing my Rib-wrapped baby cap pattern into toddler and kiddo sizes.  That should be up as another free pattern in a week I hope.  :-)
For those who will be sports watching today, I hope you have fun!

Saturday, February 5, 2011

Home for the weekend

This seems to be a common theme of late... extra family closeness and relaxation is the number one priority each weekend.  The hustle and bustle of weekday work, art lessons, schooling, supplemental schooling (have I explained this yet?) and the like, keep us from connecting as much as we want to.

Very early on as parents, Rob and I decided that family dinners together at the dinner table mattered greatly to us as this was one of just a few waking hours we could all spend enjoying and sharing with one another.  Family nighttime reading is another one and one I should touch on more often in this blog.

But now, let's talk about weekends.  Family bike rides, backyard playtime, extra giggles and extra extra hugs-- extra meals all at one table, we love it!  This weekend seems to be destined for more home fun.  Turning the dirt in the garden, banjo practice, drawing, crocheting, singing and fort building, baking and laughing.  Simple family time and memories in the making.

I hope you are all having a wonderful weekend as well.
Love, Hettie

Friday, February 4, 2011

Grilled Chicken Experiment - Take One

So yesterday, I prepared the marinade for the upcoming Grilled Chicken recipe that I spoke about in the blog before this one.  In the hurry of the day, I didn't get to complete the cucumber salad that was supposed to accompany the meal... ah well.  If it's good (I think to myself) then I'll photograph the salad tomorrow.  The chicken grills up beautifully, the jasmine rice is nice, the naan bread I had to shortcut and purchase, but still, not too bad, not too bad for a mid-week meal.

The table was set, the critics came to the table.  My oh-so-sweet hubby tells Em and Ro:  "We need to let Mommy know if the chicken is good so she can make it again, okay?" 

This has been a long-standing request of mine for Rob... if it stinks, tell me so!  If you don't say anything, I will never improve.

Em proclaims is very tasty and eats every bite!  Rob, takes his time, really tasting the chicken and murmuring slight adjustments I could make.  I quickly notice a lack of salt and know the blog with the recipe will not be going up as fast as I'd hoped. 

The clincher came with Ro... we asked him what was his favorite thing on the plate...  He looks at me, he looks at the plate.  He looks at Rob, he looks at the plate.  He chooses!

He chose the Naan bread... the bread I did not make!  Back to the culinary drawing board to tweak the recipe to, hopefully be up next week.

The dinner wasn't so bad, but the after was much nicer.  Footsies by the fire!
Happy Friday everyone!

Thursday, February 3, 2011

For those wishing for Winter to withdraw

Being a Southern California resident, I am not experiencing snowdrifts above my windows and temperatures in the 0's, 10's and 20's ... I hope these lovely pictures of the Huntington Gardens soothe those who would like to see a little sunshine in the sky.  These were taken in early May last year.


Coming soon on CelticMommy: 
  • A tutorial and pattern for a sewn stuffie -- it can be made with or without the help of a wee one (mine will be with 4 year old input!) and can also be made with soothing scented herbs and flowers inside.
  • Calming bath soaks-- did you participate in the poll on the top right of the blog?
  • Tasty indoor grilled chicken!

Tuesday, February 1, 2011

How to make Glass Tile Magnets

Crafty fun and free tutorial.
How to make Glass Tile Magnets!


This craft is a great afternoon project to do with children or friends.  You will need a bit of space and the tiles will need to stay put while drying, so I suggest setting up somewhere that can be left alone for awhile... otherwise your dining room table will not be used for dinner!  :-)


Supplies needed:
This supply list is based on 1 inch glass tiles, however you are only limited by your imagination! These glass tiles come in various sizes and shapes like squares, ovals, circles, scrabble tiles, rectangles, etc.
Links to all supplies used are at the end of this tutorial.
  • 1 inch artwork, printed on cardstock.  I chose to have all my images printed at Kinko's for the better quality than I could print at home.  New photographs could also be used.
  • Square paper punch or a steady hand, X-acto knife and self-healing mat
  • Weldbond glue
  • E6000 glue
  • Glass tiles
  • Magnets
  • Paper towels
  • Q-tips
  • Plastic wrap or parchment paper (to keep your work surface from getting dirty)
Directions:
Make sure your glass tiles are clean and free of nicks.  Some glass tiles have two smooth sides, some have one side that is a bit rough.  Make sure to use the rough side facing down if you have this kind.

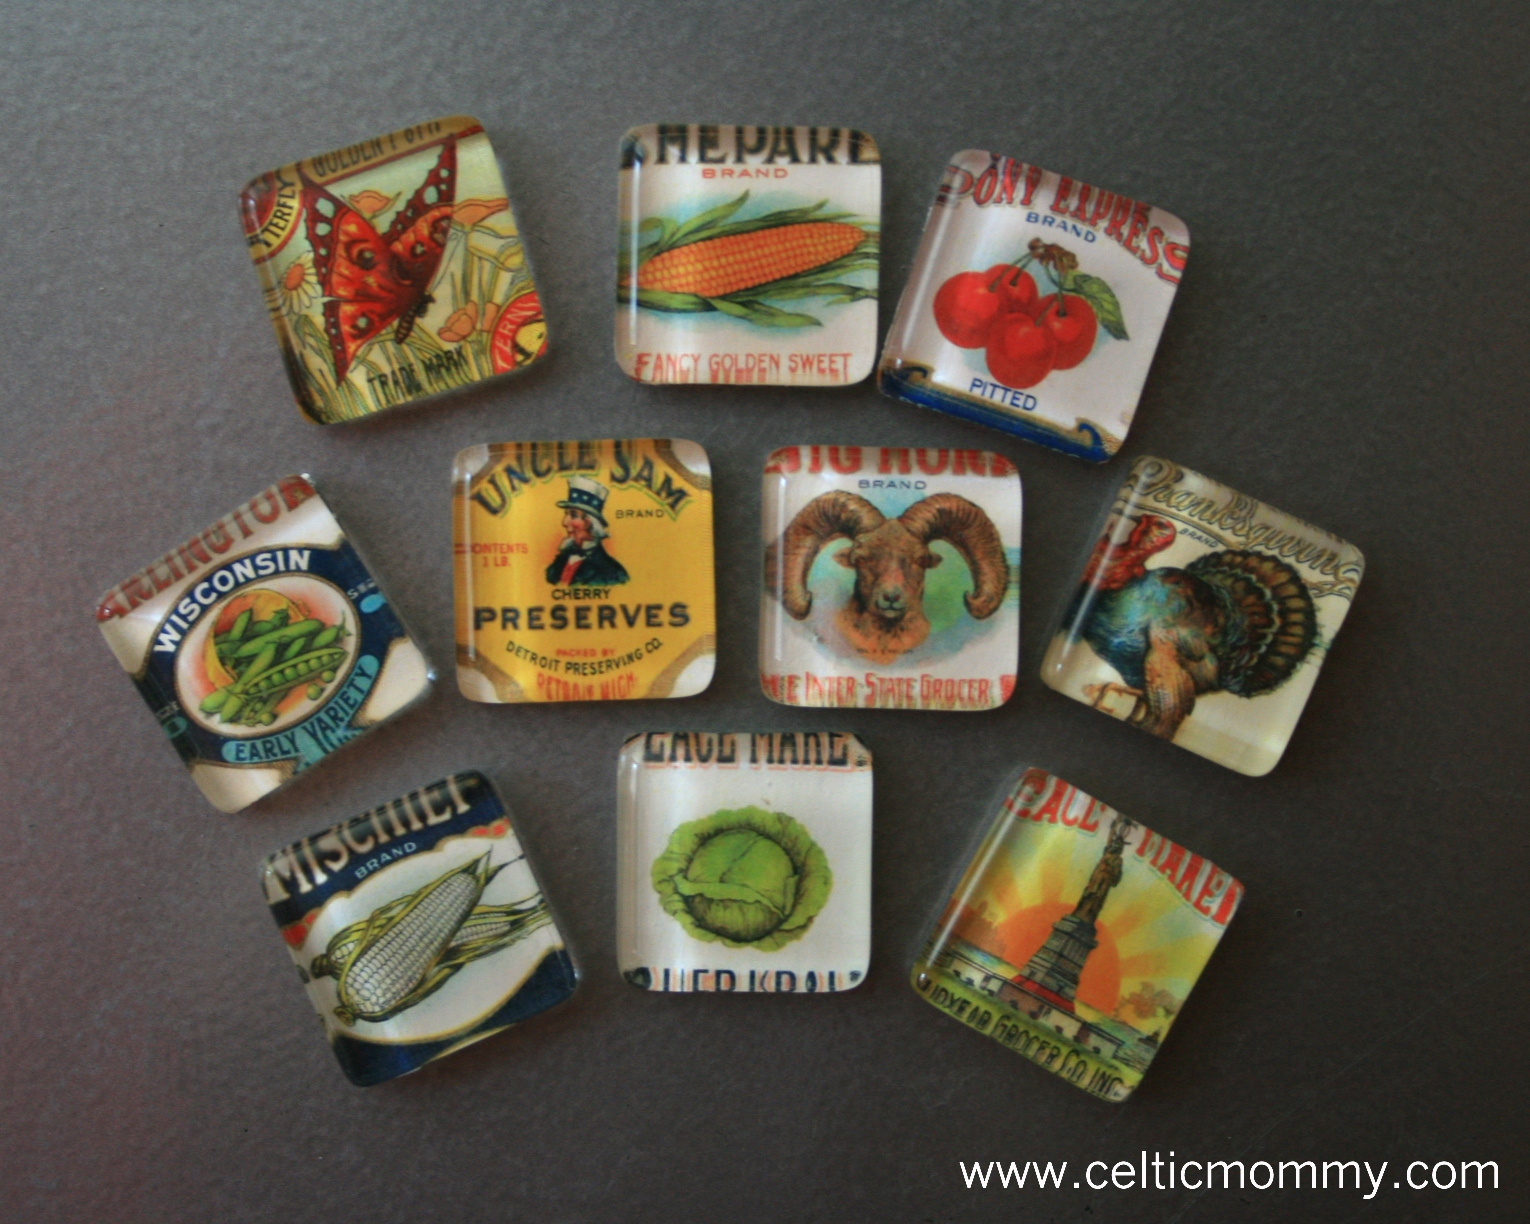
Choose your artwork for a set of tile magnets... you can easily make a set of 10 magnets at a time if you choose to.  You can find tons of pre-made artwork on Etsy, you can make your own, you can use photographs or kid artwork, etc. etc.

Cut each tile with the square paper punch or X-acto knife and place on parchment paper or plastic wrap, about 3 inches apart from each other.

Place a nickle-sized amount of the Weldbond glue on the front of the image.

Holding the side of the tile, smoosh the glass tile onto the image, the glue will seep out the sides and that's fine-- we'll be cleaning that up later.  Be sure to look for air bubbles and gently press them out otherwise you will see them when the tiles are dry as you see in this next photo.

Repeat process until all glass tiles have been put onto images.


Go have a snack!  It's best to wait about 4 hours for the next step.  You can leave the tiles for up to about 12 hours if necessary.

Lightly peel the tiles off of your plastic or parchment.  The glue that has oozed out of the sides will be slightly set and starting to clear... this is the perfect time to cut the excess off and clean up the edges.

 With your X-acto knife, lightly saw left to right to cut off the excess glue.  If the glue has not set enough, the image may move when you do this, so go ssslllloooooowwwllllyyy until you are comfortable with this step.

Repeat on all sides and all tiles until you are happy.  The tiles may still appear a bit cloudy and can take up to 24 hours to clear completely.

Apply a teeny bit of E6000 glue to the center of each tile, taking care not to get any glue on you.  Set the magnet in the center and use Q-tips if needed to lightly press the magnet into place.  Let dry for 4 hours.


Find your most precious photos and use the magnets!


Supply List:  Where did I get ....?

For the glass tiles, the teeny, ultra powerful magnets and E6000 glue:  Candy Tiles on Etsy
For the Weldbond glue, X-acto knife and the square paper punch: DickBlick Art Supplies
For the collage sheets, I purchased from:
Tragic Pixels
Aenota
Designs by Linda Nee
Magpie Mine (The Fruit/Vegetable Labels are from here!)

And last, but certainly not least, the "You are my Sunshine" card that I am utterly in love with in that last photo... the very talented Brandi from SweetHarvey made that!  I had a few people email me about it, so I thought I should add her in as well.  She's also a foodie and has a cute blog to boot!

I have more crafts to showcase using glass tiles, but this should get everyone started. 
:-)  Happy Crafting!