Sunday, July 31, 2011

Another family reader and his books

With summer in full swing, my boys have had plenty of time to relax and rearrange (and rearrange again) the things in their rooms.  As Em's reading skills increase, he asks for more new books and gives more of his old books away to his brother... not that Em will never see or use the books again, as we always have them in various stages of reading all over the place!   The hustle and bustle of books in between brothers has created a commotion in Ro's book collection, namely book crowding.


Above you see a partial collection of Ro's books.  Notice the bulges in the crates.  There actually are more books than this, but this is what fit in the space he had and the other books were rotated in.  Not easy for my munchkin to peruse at all... Ro was ready for a better way!  


Ikea bookshelves and Daddy to the rescue!  Now, the books are in order-- woo hoo!  Now, the books are much easier for Ro to find himself and put back whenever he is done with them.  Being able to come to and say "Mommy!  My room is allll clean and the books are alllll put away!" has been very rewarding for Ro.

I still have a shelf of books to bring in from the living room library, but this is a fabulous start for the newest reader of the house.

Friday, July 29, 2011

BBQ'd Hasselback Potatoes Recipe

This is the second quick and easy way to enjoy a baked potato during these hot summer months, when heating up, and spending time in the kitchen is not your top priority.  The first one, the BBQ Baked Potato in the post below this one, gives you a simply tasty and easy side dish for those evenings when you crave fluffy potato goodness.  Today's recipe will yield a melt-in-your-mouth buttery potato with a smoothly melted cheese topping.

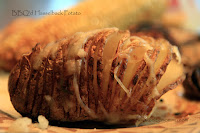
BBQ'd Hasselback Potato
I originally learned about Hasselback potatoes while at Camp Blogaway earlier this year.  The Idaho Potato Commission presented a hands-on talk on how these potatoes were sliced, dressed and baked with heavenly results.  You can see the original recipe here on their website.  My version is very similar with the BBQ and cheese twist.

Ingredients and Supplies:
One 8-9 ounce Idaho Baking Potato per person
Cold, unsalted butter
2 oz. Old Amsterdam Gouda per potato

Salt and Pepper
Two cutting boards of the same thickness -or- chopsticks
Tin foil


Directions:
Preheat your BBQ to medium
Scrub potatoes clean and let dry
Place potato on counter.  Put cutting boards along length-size of potato
With a sharp knife, cut almost all the way through the potato.  The cutting boards should ensure that you don't cut all the way through, but take extra care on the ends.  (I've lopped off many ends!)  Continue cutting thin slices as you see in the photo above until finished.
Place potato on piece of tin foil large enough to cook potato in.  Carefully spreading the potato, sprinkle with salt and pepper.

Thinly slice about 1 to 1 1/2 tablespoons butter and place along top of potato.
Cover potato completely and tightly. Repeat for the rest of the potatoes.  
Place in BBQ and set timer for 45 minutes.
Remove potatoes and carefully peel top of tin foil away as seen in photo below.  Do not take out yet.
Using a vegetable peeler, thinly slice Old Amsterdam Gouda.  Place pieces of Gouda carefully in between several slices of potato and on top.  Put potatoes uncovered but still on tin foil back on BBQ for 5 more minutes.  The Gouda will melt inside the potato and also crisp up nicely on top of the potato as you see in the top photo.
Remove potatoes from BBQ and transfer to plates, discarding extra butter in tin foil.
Serve immediately!


I hope you enjoy these two BBQ'd Potatoes and find other fun ways to use your BBQ to beat the heat in the kitchen.  Have a great weekend!

Wednesday, July 27, 2011

BBQ Baked Potato Recipe

Today and tomorrow I will give you two quick ways to enjoy a baked potato during these hot summer months without heating up your kitchen.  The first one is fast and straightforward, requires very little prep and just a bit of attention.  The second one requires a bit of prep and very little attention.  The backyard BBQ comes to the rescue of baked potato lovers!

Potato #1- Easy Peasy Lemon Squeezy!!
The BBQ'd Baked Potato

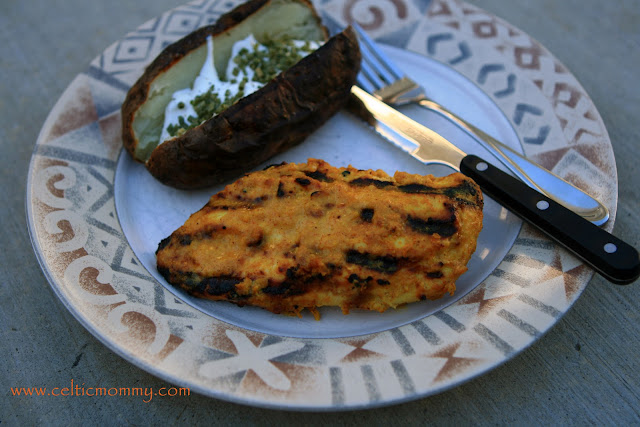
This potato may look familiar as it was featured on the plate with my Yogurt Marinated Chicken last week.

Ingredients and Supplies:
One 8-9 ounce Idaho Baking Potato per person
Olive Oil
Coarse Salt
Fork
Tongs
Timer

Directions:
Preheat your BBQ to medium
Scrub potatoes clean and let dry completely
With a fork, poke potato about 4 times each on all sides
Coat potato in olive oil and sprinkle with salt on all sides
Place potatoes on BBQ, close lid, set timer for 25 minutes
At 25 minute mark, turn potatoes over.  Set timer for 20 more minutes.  (Right about now is when you probably would start making anything else you plan to eat.)
When the second timer goes off, remove potato and gently check for doneness.  Larger potatoes may need a few more minutes.
You will notice in the above photo that the outside is nearly black and crispy, that's fine.  The flavor and texture will be similar to potato skins at your local restaurant.
Add tasty toppings and serve!  The potato will be fluffy light and heavenly.  Enjoy!

Tomorrow, is BBQ'd potato #2 - A BBQ'd Hasselback with slivers of Old Amsterdam Gouda!

Monday, July 25, 2011

Living room dance-a-thon

Pink Floyd     Morcheeba     Beastie Boys     Dan Zanes     Cake
The Black Crowes     Jack Johnson     Tom Petty & the Hearbreakers    

Living room furniture move, making way
for dancing
for running in circles
for giggling
for chasing after his brother!!


Songs spinning, kids spinning, camera spinning

Still in jammies, beating the heat in our own living room dance-a-thon!

Sunday, July 24, 2011

My berry cup runneth over with tomatoes

Another weekend spent in the garden, bent over tomato plant after tomato plant trying to get to all the ripe tomatoes... we've had an abundance of grape and cherry tomatoes this season. I had to cut back one of the plants as it was invading my raspberry climbing wires! As I wrote earlier today on the CelticMommy Facebook page (have you been there to "like" it yet?), I love being out in garden each morning, barefooted and bumbling about. Sadly this morning, a large cherry tomato was in my path and got squished! Is tomato juice a good foot exfoliant?


Anyway, after distributing about 250 of these beauties to surrounding neighbors and relatives, I wanted to get a quick pic of some of the rest of them in my beautiful new berry bowl made by Melissa of the Bridgman Pottery blog and Etsy.  I love that this bowl was made for me by Melissa and that the bowl has its' own uniqueness that typifies her wabi sabi creative spark!  Like Melissa, I too believe that the beautiful things we collect should be used and not sitting and collecting dust.

To add to that sentiment, I will soon be working on a new crochet project with some beautiful yarn that has been sitting in my stash.  Catrina of Because Mommy Said So created this sweet hat (Ravelry Link) that looks both warm and stylish!  As soon as I am done with my current seekrit project, my own pattern to be coming soon, I'll be crocheting the Nottinghamshire hat for my noggin.

I hope your cup runneth over today with all good things!

Thursday, July 21, 2011

Napkins to be

After three days of steam ironing in between our summer crafting and field trips, I've finally finished prepping yards of awesome fabric!!  Linen, Cotton, Cotton/Linen blend ... all washed, dried and ironed.  Woo hoo!

Now on to napkin making!  My last sets of napkins have lasted three years and I think they need to be replaced.  Plus, with Em and Ro attending a school that strives for "a zero percent trash lunch", I wanted to make some little napkins to go in their lunches. 


I found the tan linen/cotton fabric underneath at Ikea in the clearance section... $1.00 a yard!  And, it is pretty nice fabric I must say.  This will be for embroidered napkins for everyday home use.  The super cool three fabrics on the top layer were a wonderful surprise gift for the boys from their Tutu Karen.  Notice how Ro is laying on the dining room table behind the fabric?  Yep, the car fabric he proclaimed to be his before I could even unfold it!  Em loves the super cute wolf and sheep fabric to the left so his school napkins will be made with that and I'm still pondering that wee awesome piece of robot fabric in the center.  (Click the photo for a larger view.)

Hopefully I will have pics up of the finished napkins next week... well, some of them anyway!

Tuesday, July 19, 2011

Yogurt Marinated Chicken Recipe

Many months ago, I bought the wrong yogurt (plain instead of vanilla) for Em and Ro's breakfast.  Since I had purchased a large container, I used most of it for baking and had a bit left to experiment with.  This yogurt marinade recipe is probably the most tested and retested recipe I've ever done... trying to get it "just right" and so I hope you love it as much as we do.


A note on the ingredients, well, one ingredient specifically.  Everything in the ingredient list can be purchased at your local grocery store except for the Penzey's Sate Seasoning.  I found this spice mix quite some time ago and find it to be much much easier for quick mid-week dinners than using all the spices individually.  Penzey's is my own personal choice and I'm not paid or endorsed by them (oh how I wish!) and I feel having this in your kitchen will prove to be worth it.  Just my two cents.

Yogurt Marinated Chicken

Ingredients:
  • 2 Pounds Boneless, Skinless Chicken Breasts
  • 1 1/2 cups plain yogurt
  • 1/2 large red onion, chopped
  • 3 tbsp. (1/4 cup) Penzey's Sate Seasoning
  • 3 tbsp. crushed garlic
  • 2 tbsp. olive oil
  • 1 tsp. salt plus 1 more tsp. salt set aside
  • scant 1 tsp. white pepper
Directions:
  1. Combine yogurt, onion, Sate, garlic, olive oil, 1 tsp. of the salt & pepper in the smallest dish that will hold the chicken breasts.  Preserve 1/2 cup of marinade in a bowl, cover and refrigerate for basting later.
  2. Coat chicken breasts in remaining marinade, cover and refrigerate for a minimum of 4 hours.  6 would be better.
  3. When ready to grill, take chicken and remaining marinade out of fridge to come to room temperature while your BBQ is warming up.  Set BBQ to medium.
  4. The chicken will be thickly coated with the yogurt marinade and that is fine.  Place on BBQ and set your timer for 7 minutes.
  5. Turn chicken and baste with 1/2 reserve marinade and 1/2 remaining salt.  Set your timer for 7 more minutes.
  6. Turn chicken final time, baste with marinade and salt.  On average, the chicken will only need about 2-3 more minutes of time.  Transfer to a plate and let sit, covered for 5 minutes.
  7. Your chicken should be juicy, tasty and perfectly cooked!  Serve with BBQ'd potatoes, a sweet bowl of cut melon and a simple salad.
  8. If you have any chicken remaining, refrigerate pieces whole.  The flavor will be enhanced overnight and is a perfect cool accompaniment to a salad or warm Naan bread.

That's it!  Again, I hope you love it as much as we do.  And if not, feel free to change up the ingredients and concoct a marinade of your own!  :-)  Happy Grilling!

Tuesday, July 5, 2011

Garden Stages

Psst...  Yes little tomatoes I see you there, hanging down beyond your fence!

 
Welcome to our home sweet onions, I have a dinner date planned with you in mind.

Hello pretty berries!  You are looking rather yummy today.

I'm talking to my garden.  The days are long and dry and hot and this makes the garden talk back to us.  We have more tomatoes than I expected, onions harvesting quicker than expected, more berries than expected and a few plants unexpectedly returning for another season.  It may be a small garden, but it gives away its goodies in stages, making them last. 

The sleepy quietness here at CelticMommy is coming to a close.  I have much to share with you and a moving date coming up soon!  Recipes, crafts, links and more all showing up ahead.  :-)