Monday, December 15, 2008

Wooden ornaments for Christmas

Last summer, I got these super cool wooden Christmas light bulbs online from Casey's Wood Products in the hopes of making a string of "lights" for mini-trees for Em and Ro's rooms... they come in several sizes and with or without pre-drilled holes. Anyway, with all my sewing and crocheting last year, the project got put to the side to do this year.


When time rolled around this Fall to make the lights, I had changed my mind and came up with a super fun and fast way to use them as personalized ornaments. I used craft supplies I had on hand to aide my tight holiday budget and just love the results! Here is what I did.


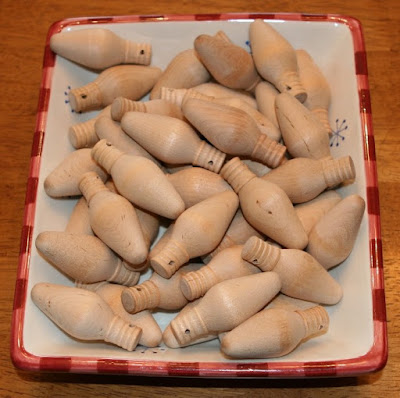
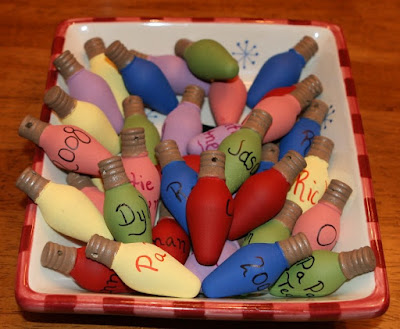
1- Paint the wooden ornaments in various colors. The first one dried by the time I was done with the last one, so it was easy to apply two coats quickly to the "light" part of the ornament. I used Delta Ceramacoat Acrylic paints.


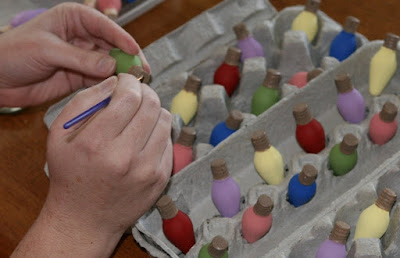
2- Paint the "metal" part of the ornament with a color similar to a real light bulb. To keep the wet paint from getting on anything, I used empty egg cartons to hold the ornaments while they dried.


3- I personalized a bunch with names of neighbors, friends and family to give them with their baked goods baskets and left the rest blank. For this, I just used Sharpies in different colors complimentary to the paint of the ornament.


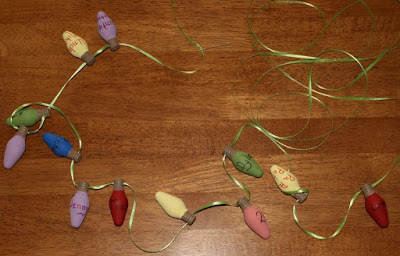
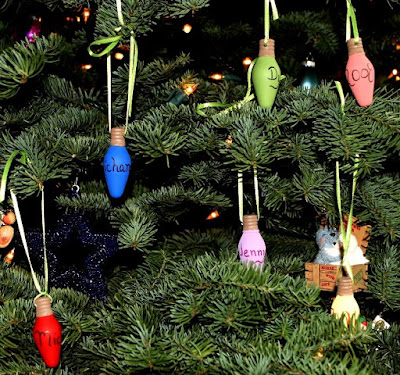
4- Using ribbon, embroidery floss, beads or plain ornament hooks... insert in the pre-drilled holes of the ornaments so they can be hung on your tree or used as a "bow" on a gift.

That's it! We made 75 ornaments in a few hours time.
I'm thinking that when I make my new order to replace this order, that I'll do them differently for the boys' trees... so many creative possibilities!! You can stain them for a more natural look, sand some of the paint off of them for a country effect, lacquer them for a shiny look... what else?
Have fun crafting!!
Oh, also, Casey's has a zillion other wooden products... easter eggs, beads, fruit, boxes, blocks. It's an excellent crafting resource!

Friday, December 12, 2008

A quick and fun gift for writers, note takers, anyone really


I have quite a few friends and family who like to read, hand write notes and keep track of quotes and such and thought that personalized note cards would be a perfect handmade gift for them!

Super easy to create and customize, here's what I did.

1- Quick field trip to Michael's to find note cards... they have all kinds of colors and sizes to choose from. You an buy as little as ten cards with envelopes or note cards only in bulk value packs.

2- Make a template in Word by changing the Page Layout to the size of the paper you purchased. For example, the note cards I made above are 5.5" by 7.5".

3- Figure out what you would like the note cards to say. Popular things for notes are:
From the Desk of _____
Heather's Hopes or Mary's Musings or Daydreams of Darren's or ... you get the idea
Places to go, People to see
Go through the various fonts Word has to offer to find ones that you think will best suit the gift recipients' personality.

4- If you would like accompanying doodles, do a Google search and find free clipart to add to the cards. In the note cards above, I looked up birds, flowers and squiggles. It is all up to your imagination to be as serious or as silly as you wish.

5- Print one out to see if you like it prior to doing a big run. Make any changes as necessary and then print away!

Please let me know if you make them and if you come up with other clever add-ons. I'd love to see pics!

Happy Printing!

Tuesday, December 9, 2008

A pretty new purse for me!

I was looking online for a fun, fast & free pattern for a purse and came across this tutorial from Tiny Happy. Perfect! I had these great scrap pieces of Alexander Henry fabric left over from gifts last year that were just the right size.

I added 2 extra inches of depth to the purse since I would be using it as a purse/diaper bag and made my pockets the right size for my phone and take-along camera. The only other thing I did differently than Tiny Happy's directions was to sew the pocket in before sewing the second seam (steps 4-6) of the lining so that I had better control of the stitching.


I love it! The whole bag was done in about 2 hours (including trips to the bathroom and queries for snacks from my boys)!
If you're looking for a quick addition to your purse wardrobe, be sure to check this one out.
Happy Sewing Everyone!