Saturday, August 30, 2008

Yummy yummy coffee cake

Once upon a time, way way back in my Junior High days, I would rush to the cafeteria at break time to grab a piece of deliciously warm, fresh-out-of-the-oven coffee cake before they ran out. My history class was pretty far from the cafeteria, so I'd miss out sometimes... sad days.

In High School, I didn't rush as quickly because I had a boyfriend to exchange mush notes with and then we'd walk to the cafeteria together... they never seemed to run out luckily. For twenty-five cents, I'd get a 4x4 inch square of warm cinnamon-y heaven! I often tried to re-create this dish but was never quite successful... until now!!

*Release the balloons and sound the trumpet fanfare!*


This is my version of the beloved Los Angeles Unified School District coffee cake.

Ingredients
For the topping:
  • 1/4 cup all-purpose flour
  • 3/4 cup packed brown sugar (light or dark as you prefer)
  • 1/4 teaspoon salt
  • 1 cup walnuts or pecans, chopped into small pieces
  • 1/4 cup butter, cut in small pieces
For the cake:
  • 1 1/2 cups cake flour
  • 1/2 cup all-purpose flour
  • 1 teaspoon each of baking soda, baking powder and cinnamon
  • 1/2 cup butter, room temperature
  • 1 cup granulated sugar
  • 1 egg, lightly beaten
  • 1 teaspoon vanilla
  • 1 cup sour cream, room temperature
DirectionsPreheat oven to 350*F (175*C). Grease and flour a 10-inch tube pan; set aside.
  1. For topping, mix together 1/4 cup all-purpose flour, sugar, salt and nuts. Add butter and rub in by hand until mixture is crumbly. Do not over mix. Set aside.
  2. In a small bowl, sift together the cake flour, all-purpose flour, baking soda, baking powder and cinnamon. Set aside.
  3. In a mixing bowl, cream together the butter and sugar until fluffy and light. Add beaten egg and vanilla. Mix well.
  4. Add half of the dry ingredients, mixing just until flour is blended. Blend in all of the sour cream. Add remaining dry ingredients and mix until thoroughly combined.
  5. Spread half of batter into baking pan. Sprinkle half of the topping and then spread the rest of the batter. Lastly, add the remaining topping.
  6. Bake for 40 minutes or until a wooden pick inserted in the center comes out clean. Let cool for ten minutes in the pan.
  7. Flip pan over onto a plate and the cake should plop right out. Flip back onto another plate for pretty presentation.
This is a deliciously moist and crumbly coffee cake that will serve 10.

If you were an LAUSD student, please let me know how you think it compares to the original... but everyone of course, enjoy!

Wednesday, August 27, 2008

Had I graduated from High School in 1956...

I mighta looked like this! Found a silly site called Yearbook Yourself while crusin' the internet.

Sunday, August 17, 2008

Banana & Brown Sugar Pancakes

This morning, we are all still a little sleepy and recovering from a wonderful birthday party last night at Oma and PaPa's house... so it was the perfect time for an indulgent sugary breakfast to get the house hoppin'! Enter brown sugar and banana pancakes.All you need is:
  • Pancake batter of choice
  • 1 tablespoon cinnamon for pancake batter (for 15 3" pancakes)
  • 3 tablespoons light brown sugar
---
  • 2 tablespoons butter
  • 2 bananas cut into 1/2" rounds
  • 2 tablespoons light brown sugar
  • 1/2 teaspoon cinnamon
  • pinch of salt
Prepare pancakes as you usually do with the addition of the brown sugar and cinnamon. Keep warm on a plate in the oven while preparing banana topping.
  1. Coat bananas with brown sugar and cinnamon.
  2. Warm butter in the same pan you made the pancakes in and add bananas.
  3. Cook for one minute without touching, add pinch of salt and turn them over.
  4. Cook one minute more and you're done! The tasty results are warmed bananas with a slightly crunchy glaze that is so good you really don't need syrup. If you overcook them, the texture gets a little funny but still edible.
Happy Sunday Everyone!

Thursday, August 14, 2008

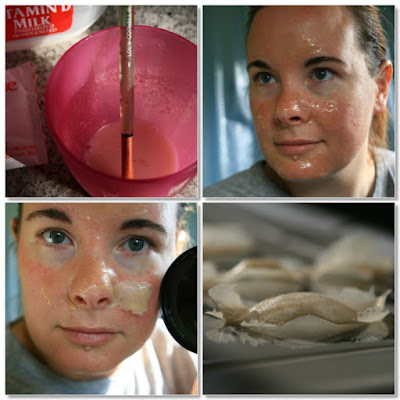
Homemade Pore Strips (a.k.a. Embarass Yourself Thursday!!)

... so I was thinking ... there are many great people out there that read my blog (THANK YOU!) who often don't have the time or money- or both -to pamper themselves.... including me. I also often have to remind myself that one of the New Year's resolutions I made was a promise to make time to take care of me as well as I take care of my family.

If I were rating myself, I'd say I was doing a fairly decent job of it most of the time-- sometimes stumbling, but always getting back on track. In this year long quest, I have found some great easy (and mostly cheap) homemade ways to keep this resolution... remember the Mother's Day Bath Salts?? Yeah, I made a bunch for me!

Last night while Rob was watching some smart-alek British TV auto show, I donned a mud mask and pondered my pores... thinking I ought to get some of those Biore Cleansing Pore Strips again. At 2 a.m., I woke up wondering why couldn't I make them myself? Hmmm...

A quick search the next morning proved that I could make my own version of the pore strips-- and with ingredients I had in the house already! So, what's a gal to do but try it out, embarrassingly document it all and share with everyone else!?!??!

All you need for one treatment is:
  • 1 teaspoon of unflavored gelatin
  • 1 1/2 teaspoons of milk (I used whole milk... but I don't think it matters)
  • A teeny spatula, new Popsicle stick or brush to apply
  • Small clean microwaveable container
  • Microwave
  • Witch hazel
Here's what you do.
  1. Wash your hands
  2. Pour milk into container
  3. Add gelatin and stir to combine
  4. Microwave for 10 seconds until mixture looks like thin oatmeal
  5. Apply to your T zone (forehead, nose, chin)
  6. Let harden for about 10 minutes
  7. Now, here comes the fun/gross part. Peel off! I try to peel from both sides slowly to make sure everything comes off.
  8. Lightly clean area with Witch Hazel and you're done!
Keep in mind from my pics that my skin is pink from Rosacea, not from this. Let me know if you try it and what you think!

Monday, August 4, 2008

Family blueberry pie baking

While food shopping on Friday, I came across some fantastic blueberries and decided we HAD to make a pie this weekend! Since pie needs to sit for a while, I knew Ro's Saturday afternoon nap time would be the perfect time to teach Em how to roll out crusts and also give the pie enough time to sit before being sliced after dinner. I grabbed several of my favorite dessert books, found the best recipe in Nancy Baggett's The All-American Dessert Book, and proceeded to get everything ready.

Em had a wonderful time adding all the ingredients to the blueberries and helping me stir everything on the stove under a slight heat before adding the filling to my completely uncooperative pie crust! We used a star shaped cookie cutter rather than little slits to vent the pie, added a little sugar to the top, and into the oven it went.

50 minutes later, the house smelled intoxicatingly delicious and the pie was done. We gave half to our neighbors and devoured the rest!