Tuesday, February 23, 2010

Pausing for Pneumonia

Well, all the running around and not taking care of myself has caught up with me and given me a great giant wallop! I haven't been online for almost a week now because of this lovely thing called pneumonia. Hospital visits, breathing treatments, medicine and liquids and more medicine and more liquids and rest rest rest!

I feel like such a sloth. I am sure my mom will be phoning momentarily to admonish me for even being out of bed for the 10 minutes it will take to write this. My husband has been an amazing trooper through all of this-- between he and my mom, the boys and the house are well loved and tended. When I'm awake, I try to crochet a bit as I'm working on a new pattern and it's mostly in my befuddled brain.
But now, I am winded again, so back to the couch to rest I go. Back soon.

Wednesday, February 10, 2010

Lavender mini pillows

I am not much of a scented items person... overly perfumey things (people, candles, room fresheners) tend to make me sneeze and hunt for, what I call, fresher, unscented air. As a result, I am prone to opening my home windows rather than grabbing a bottle of "smells like flowers" spray.

Some of you may remember a blog I wrote about my love of bringing in fresh gardenias from my garden... since the gardenias are not currently in bloom, I wanted to find another light scent I could have in the house. Enter the lavender pillows. 
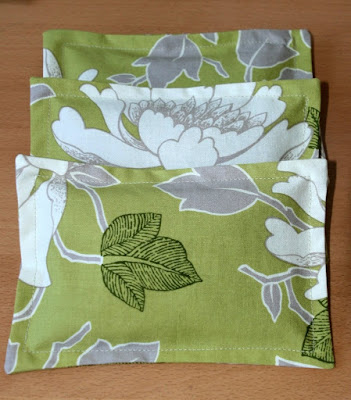
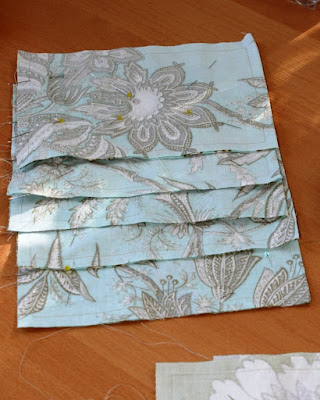
Knowing what I wanted to make, I delved into my fabric stash and found some pretty lightweight fabric pieces leftover from another project. To make one pillow sachet, you will need two pieces of fabric that are 5 1/2 by 7 1/2 inch rectangles. If you plan to make a bunch, set up an assembly line to iron, sew, fill and top stitch all the sachets.
I sewed each one with a tiny 3/8" single seam leaving a 1 1/2" gap on one of the short ends to turn and fill the pillows with. (See pins on left of photo for turning gap.)
With a chopstick (a sewing tool fave of mine), I got the corners nice and pointy and grabbed a few quick items to help me fill the pillows. I found the lavender buds at my local health food store (organic and non-organic buds are also available online) and bought about 5 ounces to make 6 pillows. I also purchased some dried organic rosebuds to put in another set as a gift.
For the lavender, I was able to use a kitchen funnel. I spooned the rosebuds in with a tablespoon being careful not to crush them. Each pillow has about 2/3 - 3/4 of a cup inside.
Once filled, I closed each pillow with a blind stitch (tutorial) and got them ready for the last step.
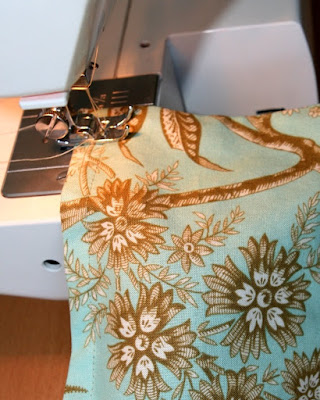
I top stitched 1/2" all the way around, maneuvering the lavender so it would not get in the way... for mostly flat little pillows, this was actually the hardest step! You could hand sew a top stitch or leave them as-is, but I liked the look, so I went with it.These pillows are in my bathroom, bedroom and living room and will give off just enough scent to last with me through the winter of closed doors and windows.
Lightly jostling them brings the scent right back, but you can also microwave them for about 10-15 seconds to revive them if you wish.
If decide to you make yourself a set and would prefer another scent, there are many other choices besides lavender and rosebuds... lemon peel, cedar, sage and myrrh to name a few. Please let me know if you have any other suggestions and I'll add them to the list.
Happy Crafting!

Monday, February 8, 2010

Valentine Paperweights

This is Em's first year of giving out Valentine's and he decided he wanted a "tree of hearts" and to make something for each of his classmates. For a mommy on a budget, the creativity hat is never far away, so to the kid craft books we went. Here is what he made.


We began with a typical salt dough recipe (1 cup of salt, 2 cups of flour, 1 cup of warm water) and rolled out various shaped and sized hearts. The rolling pins are available at Lakeshore.


The hearts then baked in the oven at 225 degrees for 3 hours. In past experiences I've found that a higher oven temp. will make the salt dough puff up, so it's low and slow that I think works best.


Next he painted all the backs and then went back to do all the fronts, adding a dusting of fine glitter while the paint was still wet. We let them dry for an hour before making a wrapping assembly line.
Some chocolate kisses and a homemade card complete the gift. I found the Valentine tree that Em wanted online. It is a beautiful (free to use) drawing by Australian artist Matthew Martin.
We used that for the front of his card and cardstock I had on hand to print them out.


A wee bit of tissue paper and some yarn to tie it all up and voila! Valentine goodies for school all ready to go! (Well, after repeating the process for all the kids and teachers of course!)


Happy Crafting!

Saturday, February 6, 2010

See's Candies in a Cookie


For as long as I can remember, I have always LOVED See's Candies... very specific ones. If someone ever bought me a box of soft centers or the regular mixed box, the butterscotch squares were the first to go... as in 2 seconds after the box was opened! Between butterscotch squares and the California Crunch candies (which are not in a standard box), I had my salty and sweet cravings covered.

A few days ago, I took my sons for a quick treat to See's for a lollipop and HAD to have a Butterscotch Square. The candy did not even make it out of the store... heck, it didn't make it into a bag! It went from under the counter, to the employees hand and scale for measuring and right into my mouth! Well, not the whole thing. I will spare the food play-by-play, but let's just say, my kids were quite amused with how slowly and quietly I stood there for about a minute just nibbling on that sweet concoction of brown sugar and milk chocolate.

We headed home. Me in confection heaven, the boys making a mess with their lollipops. Fresh with an idea of a cookie to mimic the Butterscotch Square, I headed into the kitchen after setting the boys to crafting. Here is the result. This is my interpretation of course. If you make it or talk about it, please please let me know what you think! I love getting comments and knowing what others think... good or bad!
And now, without further delay, the recipe!

CelticMommy's Butterscotch & Chocolate Cookies

Ingredients:
    1/2 tsp. salt 1/2 tsp. baking soda 1/4 tsp. baking powder 2 cups and 2 tblsp. all-purpose flour (I use King Arthur Flour) 1 3/4 sticks (14 tblsp.) cold unsalted butter (I use Land O'Lakes) 1 3/4 cups tightly packed dark brown sugar (light is okay, but dark is better) 1 large egg plus 1 egg yolk 1 tblsp. single strength vanilla (I use Penzey's) 2 4oz. Ghiradelli Milk Chocolate Bars (Semi-sweet is okay)

You will also need parchment paper, a stainless steel skillet, a 1 teaspoon measuring spoon, a 2 cup Pyrex measuring cup or other steep sided microwaveable cup and a wire rack for cooling cookies and chocolate drippings.
Also, this is a bit of a process. While one batch is baking, another will be cooling and a third can be taking its' chocolate bath.
Directions:
  1. Preheat oven to 350 degrees
  2. Line cookie sheets with parchment paper
  3. Combine salt, baking soda, baking powder and flour in a bowl and set aside.
  4. Cut the 3/4 stick of butter into 6 pieces and set aside.
  5. Heat remaining 1 stick of butter in stainless steel skillet on low heat. Stir butter until it is brown. DO NOT LEAVE BUTTER as it can burn quickly! It will brown in about 2 minutes depending on your stove. Pour butter in medium glass bowl. Add remaining butter, stir to melt.
  6. Add brown sugar to butter and combine.
  7. Add vanilla and eggs and combine. There should not be any clumps of brown sugar.
  8. Add half of flour mixture and stir until just mixed in. Add remaining flour and mix and scrape sides down until you have a pretty ball of dough.
  9. Take 1 teaspoon of dough at a time and roll into balls (see photo) and place on cookie sheet, each ball about 2 inches apart.
  10. Bake for exactly 9 minutes. Take out and let cool on the cookie sheet for 2 minutes before transferring to wire rack to cool completely.
  11. Repeat until all dough is used, making about 4 1/2 dozen cookies.
  12. Melt 1 bar of Ghiradelli chocolate in microwave according to directions (double boiler is fine too). Use second bar as needed.
  13. Dunk cookie about 1/3 of the way, turn and dunk again, making kind of a Pac-Man looking shape with the chocolate.
  14. Transfer back to wire rack to cool.

Enjoy!

Friday, February 5, 2010

New Recipe Tomorrow!

My tribute to See's Candies Butterscotch Squares coming tomorrow! I just have to get the boys to stop eating them long enough to take photos!!