Since I make so many t-shirts and onesies and fabric by painting with freezer paper stencils... and since I've had several questions on how it all actually works, I figured I'd do a more thorough how-to with bigger photos than the old tutorial I wrote last year. Once you read this overly-thorough tutorial, you'll have the process down pat. And it is super easy to customize, embellish... go nuts really. The painting aspect of this project is perfect for kids (about 3 1/2 and up) and adults alike.
Perfect for those stained T's you don't want to discard... or for new shirts, gifts, etc. Ready?! Here we go!
1- (Not shown) Wash and dry your t-shirt... preferrably all cotton.
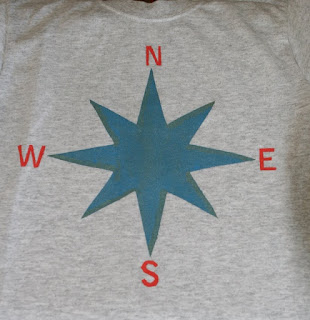
2- Find a picture you want to put on a t-shirt. In this example, I did a search for a compass, found one I liked, and printed that out. Since it did not have directional markers, I printed those out in a font I liked. See first photo.
3- Gather all supplies needed and tape drawing to the self-healing mat or a piece of cardboard so that you do not ruin the surface by cutting into it. The darker the drawing the easier it will be to see through the freezer paper.
4- Cover drawing with your freezer paper. Notice, it is shiny side down, smooth paper side up. Tape down freezer paper being careful not to use tape near your drawing... you will need to remove it prior to ironing the stencil onto your shirt.

5- Cut around the outside of your drawing until you end up like the next photo. Notice I did not cut out all the compass points... that's what's fun about creating... you can do what you want!
6- Carefully remove the stencil from the board. Gently remove any remaining tape. You now have a one-use-only stencil. Your project will be one-ok-a-kind! Excited yet?

7- Set your iron on Cotton, without steam. Steam will cause bubbles in the stencil and those will cause paint bleeding underneath... we don't want that.
8- Cut a second piece of freezer paper to put in between the front and back of the t-shirt. You know... where your body will be when wearing your art!
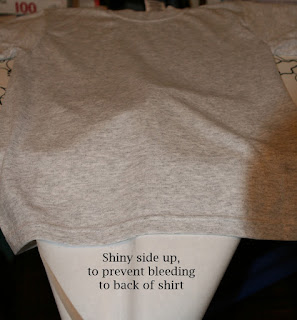
9- Place second piece, shiny side facing up (see photo) so that, when ironed, it will stick to the underside of the front of the shirt. This will prevent any bleeding through of the paint onto the back of the shirt.
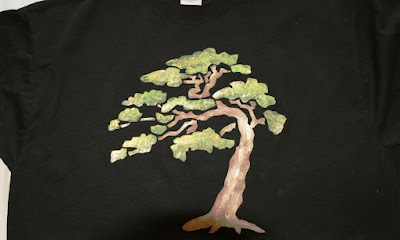
10- Position stencil where you want it on the front of the shirt and slowly iron on. If you use a stencil with intricate and small pieces (such as
this tree), take care to check that the stencil is pressed down at all the edges.
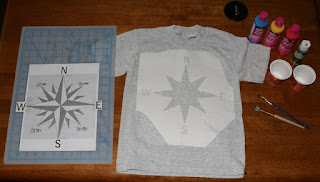
11- Gather together everything you will need to paint. See photo.
Fabric paint in colors of choice.
Cups or paper plate for paint. A paper plate is much better if you are doing some mixing of colors such as the caterpillar or Ohm shirts in the
previous blog.
The shirt
Brushes for stenciling and if you are adding detail.
The drawing for reference
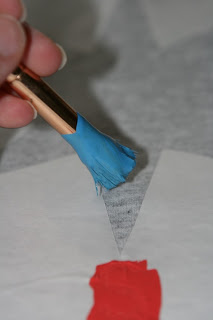
12- For large areas, a stencil brush or even a craft foam brush will work great. Do not glob the paint on and be careful not to push around the edges... think up-and-down like the needle on a sewing machine.
Tip: The darker the shirt, the harder it will be to cover and will possibly need more than one application of paint. The tree shirt in the previous blog was made over several days.
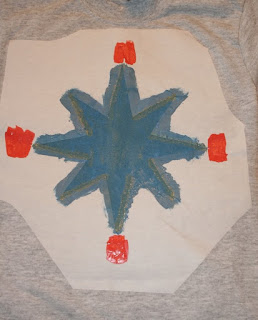
13- When done painting, let the shirt dry for 4-24 hours before removing stencil.
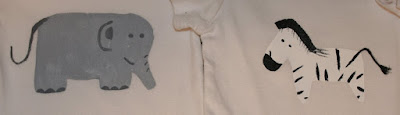
14- Peel stencil away from shirt. At this point, you can embellish the shirt if you choose to with freehand accents such as the Alligator, Zebra, Giraffe, Lion and Elephant onesies in the previous blog.
15- Keep the freezer paper inside the shirt in place. Cut one last piece and set your iron back to the same settings as in step 7. Cotton setting without steam.

16- Place freezer paper, shiny side down onto top of newly stenciled area and iron. This will help to set the paint and edges and will prevent the paint from transferring onto other clothing when washed.
17- Woo Hoo! You're done! You've created a one-of-a-kind t-shirt for yourself, a kid, a gift... whomever you wish.
CARE INSTRUCTIONS: Since making my first shirt in January '08, I've made and taught others to make over 100 of these shirts. I've washed Em and Ro's first freezer paper stenciled shirts (
first posting on this) probably 75 times by now... and, as long as you wash them inside out, everything is fine.
If you give one of these as a gift, please add that little instruction and you're good to go.
Okay, that turned out longer than I thought it would. If you make, link, or use this tutorial, please let me know. I love seeing how creative others can be when set loose with paint and an idea.
And of course, have fun!!
 already! There are several green ones too... this strawberry is the size of a quarter maybe...? Now that the lettuce is netted and protected from birds, they are growing quickly! Tomatoes are looking good, raspberry canes are leafing (is that the right term?) and the blackberries are still bare. That's okay... I know they're a long term investment.
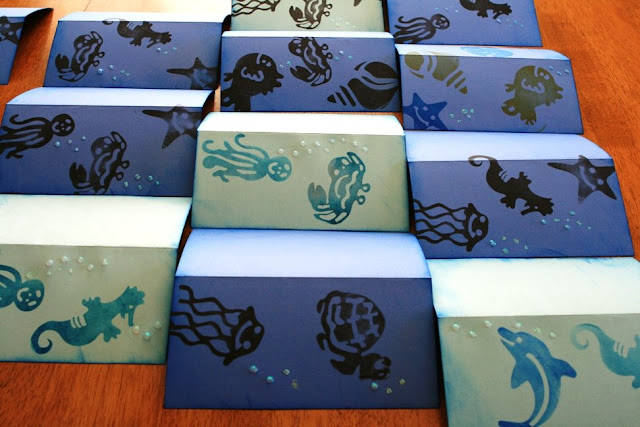


 5- Cut around the outside of your drawing until you end up like the next photo. Notice I did not cut out all the compass points... that's what's fun about creating... you can do what you want!
 7- Set your iron on Cotton, without steam. Steam will cause bubbles in the stencil and those will cause paint bleeding underneath... we don't want that.
 9- Place second piece, shiny side facing up (see photo) so that, when ironed, it will stick to the underside of the front of the shirt. This will prevent any bleeding through of the paint onto the back of the shirt.
 11- Gather together everything you will need to paint. See photo.
 12- For large areas, a stencil brush or even a craft foam brush will work great. Do not glob the paint on and be careful not to push around the edges... think up-and-down like the needle on a sewing machine.
  13- When done painting, let the shirt dry for 4-24 hours before removing stencil.
 16- Place freezer paper, shiny side down onto top of newly stenciled area and iron. This will help to set the paint and edges and will prevent the paint from transferring onto other clothing when washed.
 17- Woo Hoo! You're done! You've created a one-of-a-kind t-shirt for yourself, a kid, a gift... whomever you wish.