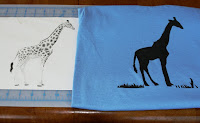
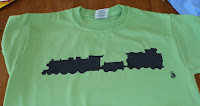
Yesterday, my mom came over to make t-shirts with Em and I. She had NaNa-and me time with Em by making his train shirt, while I made Ro's giraffe shirt. Here's how we did it.
I found the train and giraffe pictures by doing a Google image search. Once I found the pictures that I thought would look good, I saved the pics, sized them to fit the t-shirts and printed them out.
Tape the picture to a self-healing mat (or a few layers of cardboard so you don't ruin your table) and then tape a piece of freezer paper, shiny side down, on top of that. With an X-acto knife, cut out the silhouette. Carefully remove the tape and there's your stencil!
I got the shirts at Michael's when they were on sale for 2/$5, but you can really work with any cotton or cotton blend shirt, onesie, fabric, etc.
Iron the stencil, shiny side down to the shirt (or any other garment you want to). Iron an additional piece of freezer paper to the inside of the shirt so that the paint doesn't bleed through to the back of the shirt.
 Paint using fabric paint (available at Michael's and Jo-Ann's) and any sturdy paint brush. You don't have to use a stenciling brush... note in the above pic that my mom and Em are using kids brushes, nothing fancy schmancy.
Wait patiently to dry. When dry (about 2-4 hours), slowly peel off the stencil and reveal your original work-of art!
Be sure to follow the instructions on washing/drying as labeled on the fabric paint tube.
The stencils took the longest to do (about 1/2 hour per picture), so I did that ahead of time. The rest of the project took about 2 hours, so this was an easy Mommy-NaNa-and-Me project that we were able to complete while Ro was napping.
Since this was our first time painting t-shirts, we went with a simple black silhouette, but now I'm pretty sure we'll be doing all kinds of crazy things! I'll post more pictures as we make them.