Friday, July 26, 2013

CelticMommy-- A Work in Progress

Blogger tells me that this is my 300th post!!  Woo Hoo!  Honestly though, I knew the big 3-0-0 was looming and wondered if I should do something for this personal milestone.  And decided in typical me fashion to do something that made sense to me.  I sipped tea, snapped a pic, and sat to type.

This is me, CelticMommy.  I am a Work in Progress.  I still don't know where this blog is headed and I'm okay with that.  I can't honestly imagine setting in stone what this space will ever be or become.  It evolves as I evolve.  So, thank you for reading along with me these past six years and I hope you continue to stay.

Happy Friday!
Love, Hettie

My latest Work in Progress, Ro's blanket.  

Wednesday, July 24, 2013

Tutorial: DIY Silhouettes

When I was in third grade, I sat for a paper cutting artist who made my silhouette.  My mom still has it.  Sadly, paper cutting artists are no longer widely available around here, but the idea of a silhouette of my children prompted me to find a way to recreate the look.  This tutorial will show you one way to achieve the classic art without the paper cutting skills.

What you need:
A digital camera
Heavy card stock and printer
X-acto knife and healing mat or something to protect your cutting surface
Black acrylic craft paint (I used Americana)
Spray adhesive or glue stick (not liquid glue)
Background paper in color or pattern of choice and a frame

What to do:
If you have a bit of patience, the reward is worth it.  This project can be done in an afternoon (other than the overnight paint drying) with minimal supplies needed.  I bought everything at my local hobby supply store.


Take profile photos of your children in a well lit area with a light or white background.  Crop as needed to get as close to an 8 x 10" printing as you can.  Print using the "heavy card stock" paper selection on your printer.  Using your X-acto knife, cut around the silhouette.  As you can see with Ro's profile already cut out on the right (below), I tried to accent his cute spikes on the front of his hair.


Slowly and lightly paint your silhouettes with the acrylic paint.  If you do not want classic black, have fun picking a color that matches your own decorations.  Let paint dry overnight.  (Note:  If you accidentally used too much paint and your silhouettes curl, you can press under books with wax paper when dry.)


Mount silhouettes using spray adhesive or a glue stick. I tried both and preferred the ease of the glue stick. Liquid glue is a bit too messy for this task and can cause ripples in the finished product.  


Once your silhouettes are dry, place in frames and you're ready to hang.  I dated the silhouettes on the backs of the frames so I would remember Em and Ro's ages of when these were made.

Other options:  I've seen people make smaller silhouettes and mount them in a double frame as a gift to grandparents.  You can also do them in multiple colors and layer them together for a new twist.

If you make your own silhouettes, I'd love to see them!  Please feel free to link back to your blog in the comments below.

Happy Memory Making!  -Hettie

Tuesday, July 23, 2013

A beachy day

Point Dume State Beach is right next to Zuma Beach and much less crowded for I don't know what reason.
 A cloudy morning meant the beach was mostly ours.  Squawking seagulls waited for me to leave my blanket so they could try to forage in my bag for goodies, but I kept everything out of sight so their visit was quick.
I crocheted the morning away while Em and Ro ran back and forth from me to the water.  A sip of water here, a munching of popcorn there, and all was calm with the day.
I love that the boys had moments to talk and laugh to themselves.  Judging by the frequent laughter, they were joking about something very silly.  As they get older, I hope these moments continue to happen and that their brotherly relationship grows stronger.
As the snacks ran out in the early afternoon, the clouds left and the heat turned up.  The running back and forth turned to walking  s  l  o  w  l  y, so I knew it was time to head back through the canyon to shake off the sand and plan for another day of fun.

Beachy days are the best.

Friday, July 19, 2013

Heading into the weekend

A quick hello to start your Friday.  :-)  We are heading to the beach for some sand castle building and shell collecting.  I hope you have a wonderful weekend!

A few photos from the week.
Ro reading
Making Great Grandma's potted meatballs
Wilson cooling on the kitchen floor
Kitchen potholder experimentation
Catapulting and collecting data
Out for an evening walk

Tuesday, July 16, 2013

Recipe: Grilled chicken and strawberry salad with BBQ baked potato


Temperatures are topping the 100 degree mark here this week so all of our dinner making moves outdoors.  One small thing is made indoors and can be done early in the day before it gets too hot to use the stove.  Or, you can just buy that one thing pre-made and keep your indoor kitchen cool.  The preparation may seem long, but it's really not... I just wrote every step out so you can see how everything is ready-to-go at the same time.

Grilled Chicken and Strawberry Salad with BBQ Baked Potato
(serves 2 adults and 2 children)

Ingredients:
For the grilled chicken

  • 3-4 boneless, skinless chicken breasts
  • 1/3 cup olive oil
  • Juice of 1/2 lemon
  • 2 tsp. coarse sea salt or other coarse salt
  • 1 tsp. black pepper
  • 1 tsp. granulated garlic
  • 1 tsp. granulated onion
  • 1 tsp. granulated sugar
  • 1 tsp. sweet paprika
For the BBQ Baked Potatoes
  • 3-4 8 ounce Idaho baking potatoes
  • 1/2 cup olive oil
  • 1-2 Tbsp. coarse sea salt or other coarse salt
  • Unsalted butter, sour cream or toppings of your choice
For the Strawberry Salad
  • 2 heads romaine lettuce
  • 1 pound ripe strawberries
  • 1/2 cup candied walnuts (pre-made or make ahead)
    • If making, need 2 Tbsp. unsalted butter, 1 Tbsp. brown sugar, 1/2 tsp. salt, 1/4 tsp. cinnamon
  • 1/2 cup sharp white cheddar cheese, shredded
  • Balsamic vinaigrette 
Directions:  The first two steps can be done earlier in the day if you have time.
Make the candied walnuts.  Toast walnuts on stove top on low flame for three minutes, stirring constantly.  Add butter, brown sugar, salt and cinnamon and stir for 2-3 more minutes.  Lay on napkin or paper towel to cool.  Set aside.

Shred cheddar, chop lettuce and slice strawberries.  Set aside separately in the fridge to keep cool.


About 1 hour before dinner, make BBQ Baked Potatoes.  I wrote about these two summers ago and they have become a staple for us.  When you turn the potatoes at the halfway mark (about 25 minutes), you can start on the chicken.

Making the grilled chicken.  Combine olive oil and lemon in a small bowl.  Combine salt, pepper, garlic, onion, sugar and paprika in another small bowl.  Wash chicken and pat dry.  Take everything out to the BBQ.

Brush oil/lemon on top of chicken breasts.  Sprinkle seasonings on top and place, face-down on BBQ.  Repeat for the other side of chicken quickly without burning yourself.  Close lid and let cook for 8-9 minutes depending on size of chicken breasts.  Turn and let cook until done and then bring in the house to cool. The potatoes are almost ready, so you can turn your BBQ off and leave them there for a few minutes.
  • On dinner plates, place chopped romaine, candied walnuts, and sliced strawberries
  • Bring potatoes in from BBQ, slice open and place on the side of plate (see photo up top).  Add toppings as you prefer but honestly, these only need a pat of butter.  The salt from the outside is deliciously crunchy and will find its' way in to the potato adding a smoky salt punch.
  • Slice cooled chicken and put on top of salad.  Sprinkle white cheddar over chicken and salad.
  • Lightly dress with balsamic vinaigrette and serve.
We had additional strawberries on the side, but honestly, the meal was the perfect size for each of us.
I hope you love this meal as much as we do.
Happy Grilling!
Hettie

Monday, July 15, 2013

Tutorial: Sew your own dish drying mat


Since I already had my giant cutting mat out 
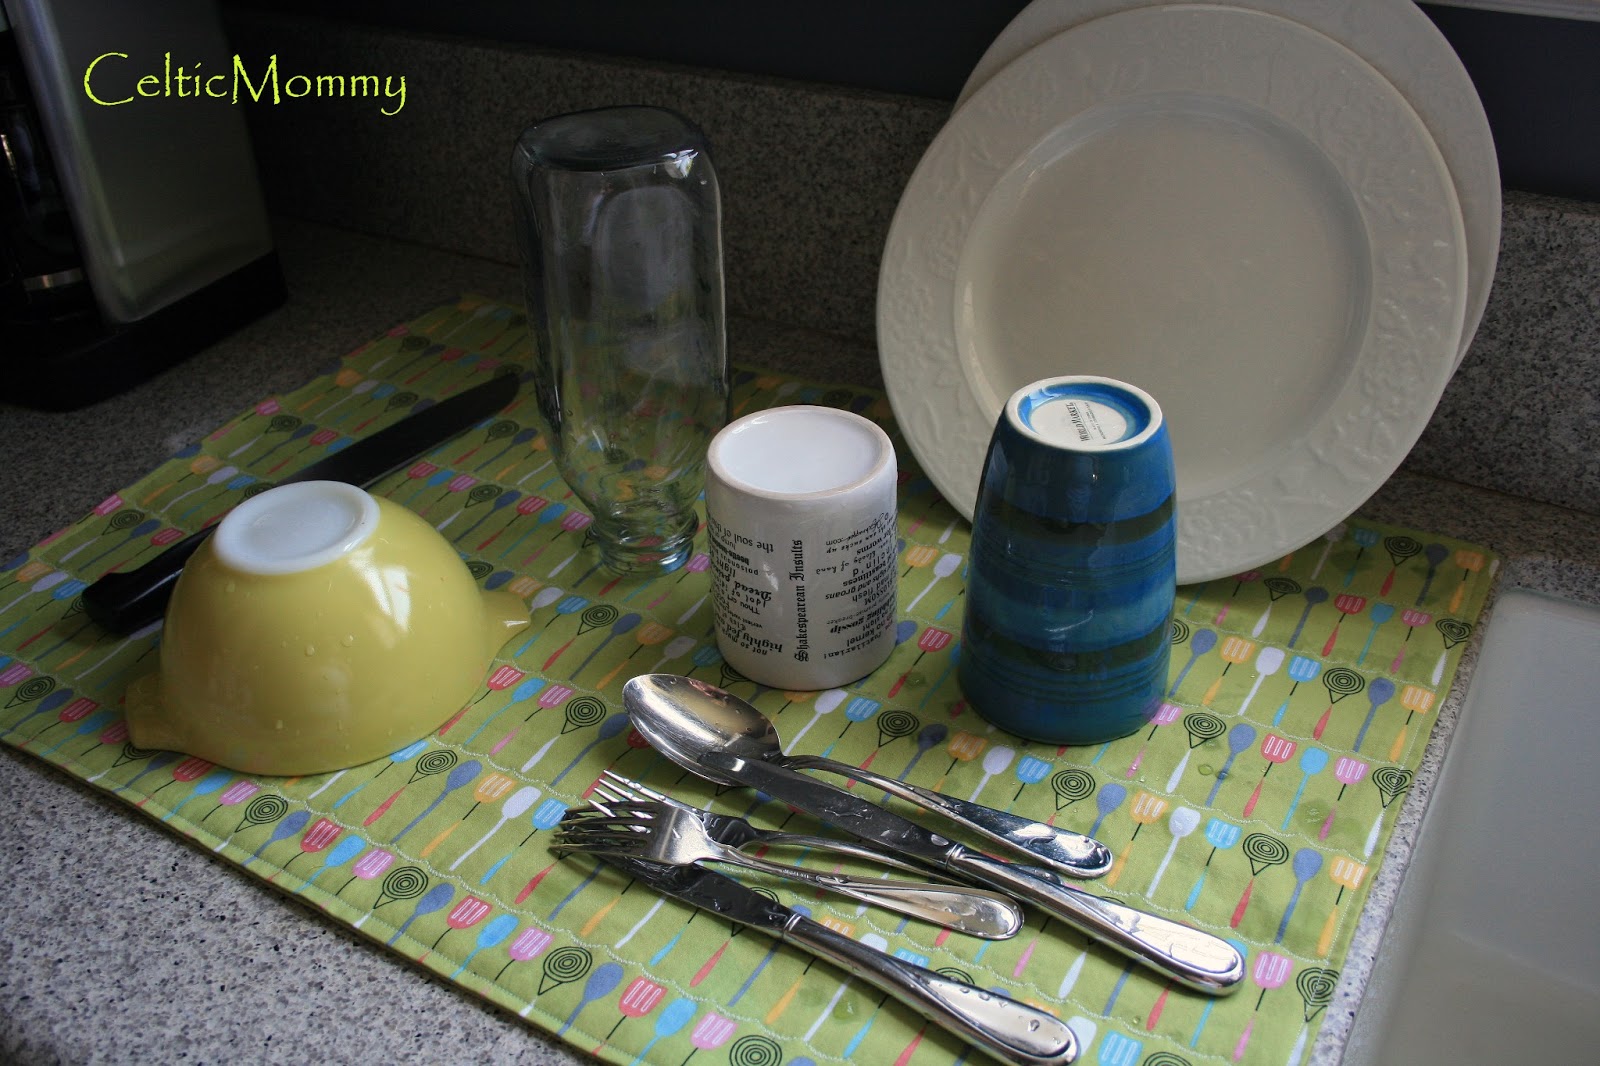
this weekend, I decided to make a new dish drying mat for my kitchen.  I stopped using a plastic drying rack last year and made myself a drying mat using a cotton kitchen towel and some cute cotton kitchen fabric I bought last year from Superbuzzy.  Getting rid of my drying rack has freed up the counter space as I can fold my drying mat and pop it in a drawer whenever I need room.  Having one drying mat was fine, but I wanted to make another one so that I could rotate them for cleaning.  The dish drying mat can be made by a beginner in a quick afternoon if you have your fabric washed and ready to go.  I used my trusty Kenmore sewing machine, so fancy equipment is not necessary either.

What you'll need:  (Makes two 17" x 25" dish drying mats)
1 1/4 yards cotton fabric, washed and ironed
2 all cotton dish towels in coordinating color, seams ripped out, washed and ironed
thread
seam ripper, straight edge, pins
rotary cutter and self healing cutting mat (If you do not have these items, just pin and cut your fabric together with sharp scissors instead.)

Step by step:

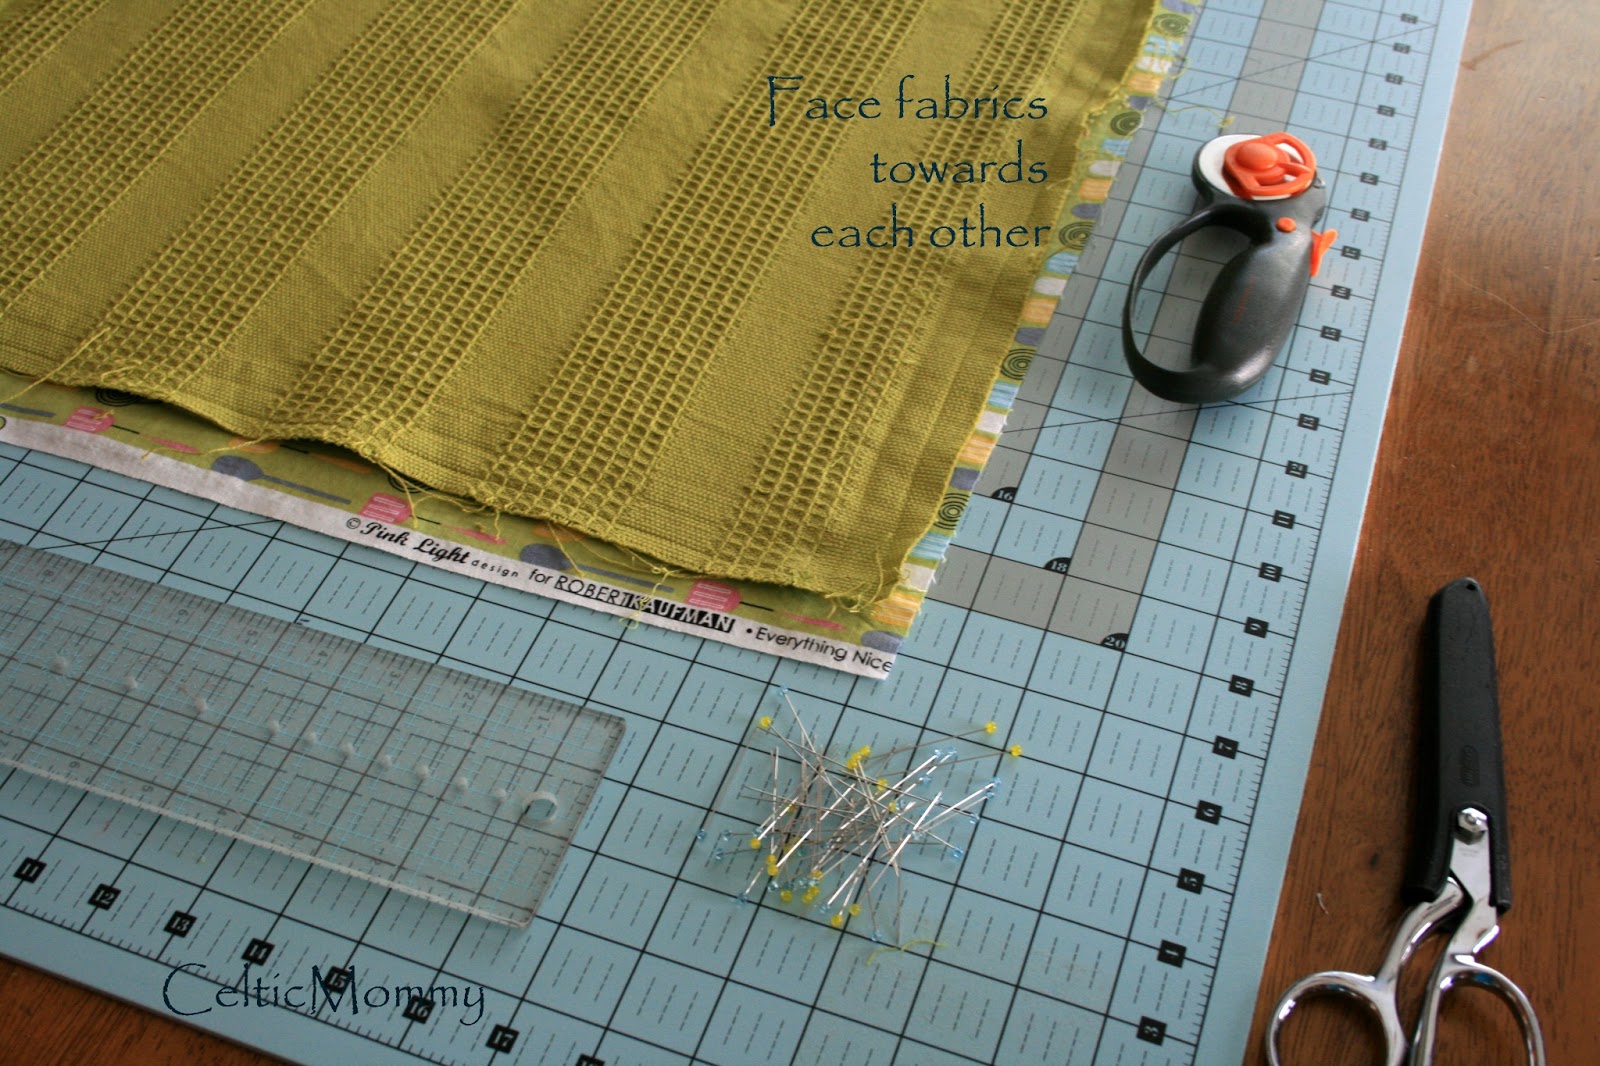
Lay cotton fabric face up on cutting mat.  Put dish towel face down (if two sided) on top.


With straight edge, trim fabrics.  My cotton dish towels were roughly 18x26" after ripping out the seams but before trimming as you see above and below.


Pin fabrics together leaving an opening about the width of your hand on one of the short sides.  You'll be able to turn the fabrics right side out with ease when sewn together.  I put two straight pins below the fabric line as an indicator of where to stop sewing.  (Click on photo below to enlarge if necessary.)


Sew around with a 1/4" seam, back-stitching at the beginning and end.  Clip corner edges so that the corners will be nice and pointy.  Remove all pins and turn fabric right side out.  Using your fingers, a chopstick or a closed pen, press out corners.  Iron drying mat, taking care that the opening section has the fabric closed nicely.

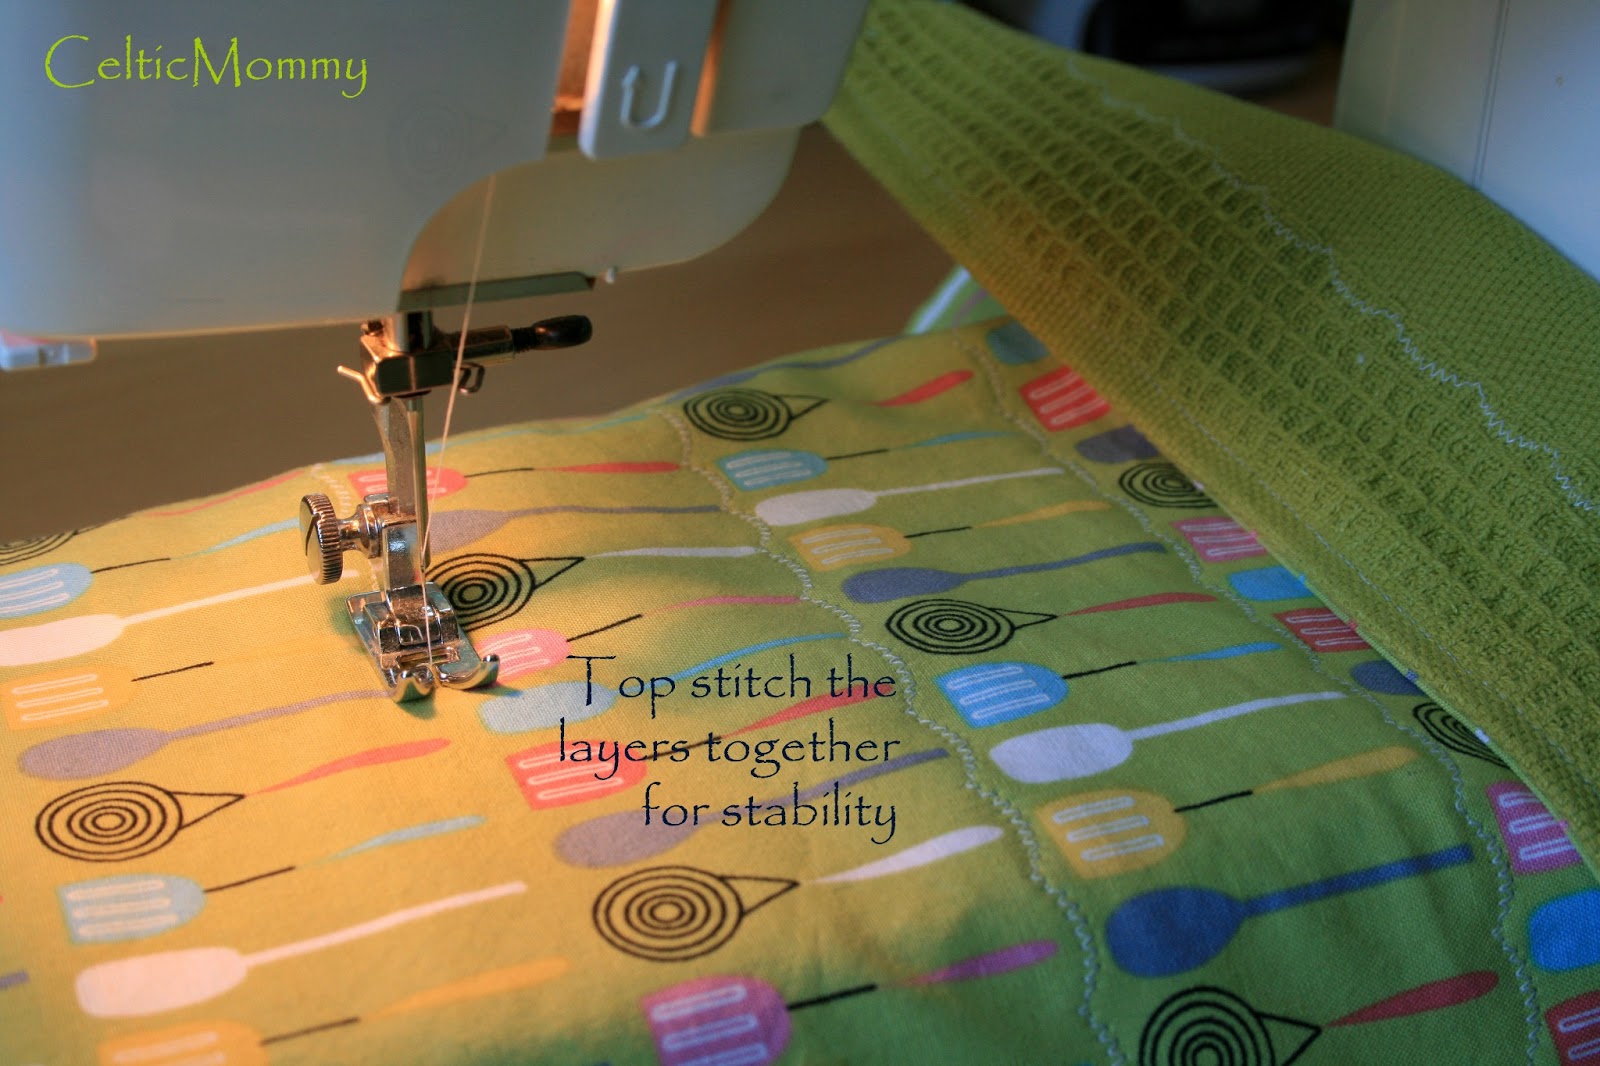
Top stitch very closely all around the drying mat, closing the opening and making a nice edge.  If you have a decorative stitch on your sewing machine, change your settings to use that for the next step.

Working with your fabric design, top-stitch several rows.  If you are a quilter, you can have fun with this.  I just made rows in between my fabric's design.  The top-stitching adds stability for when the mat is in use and especially when washed.


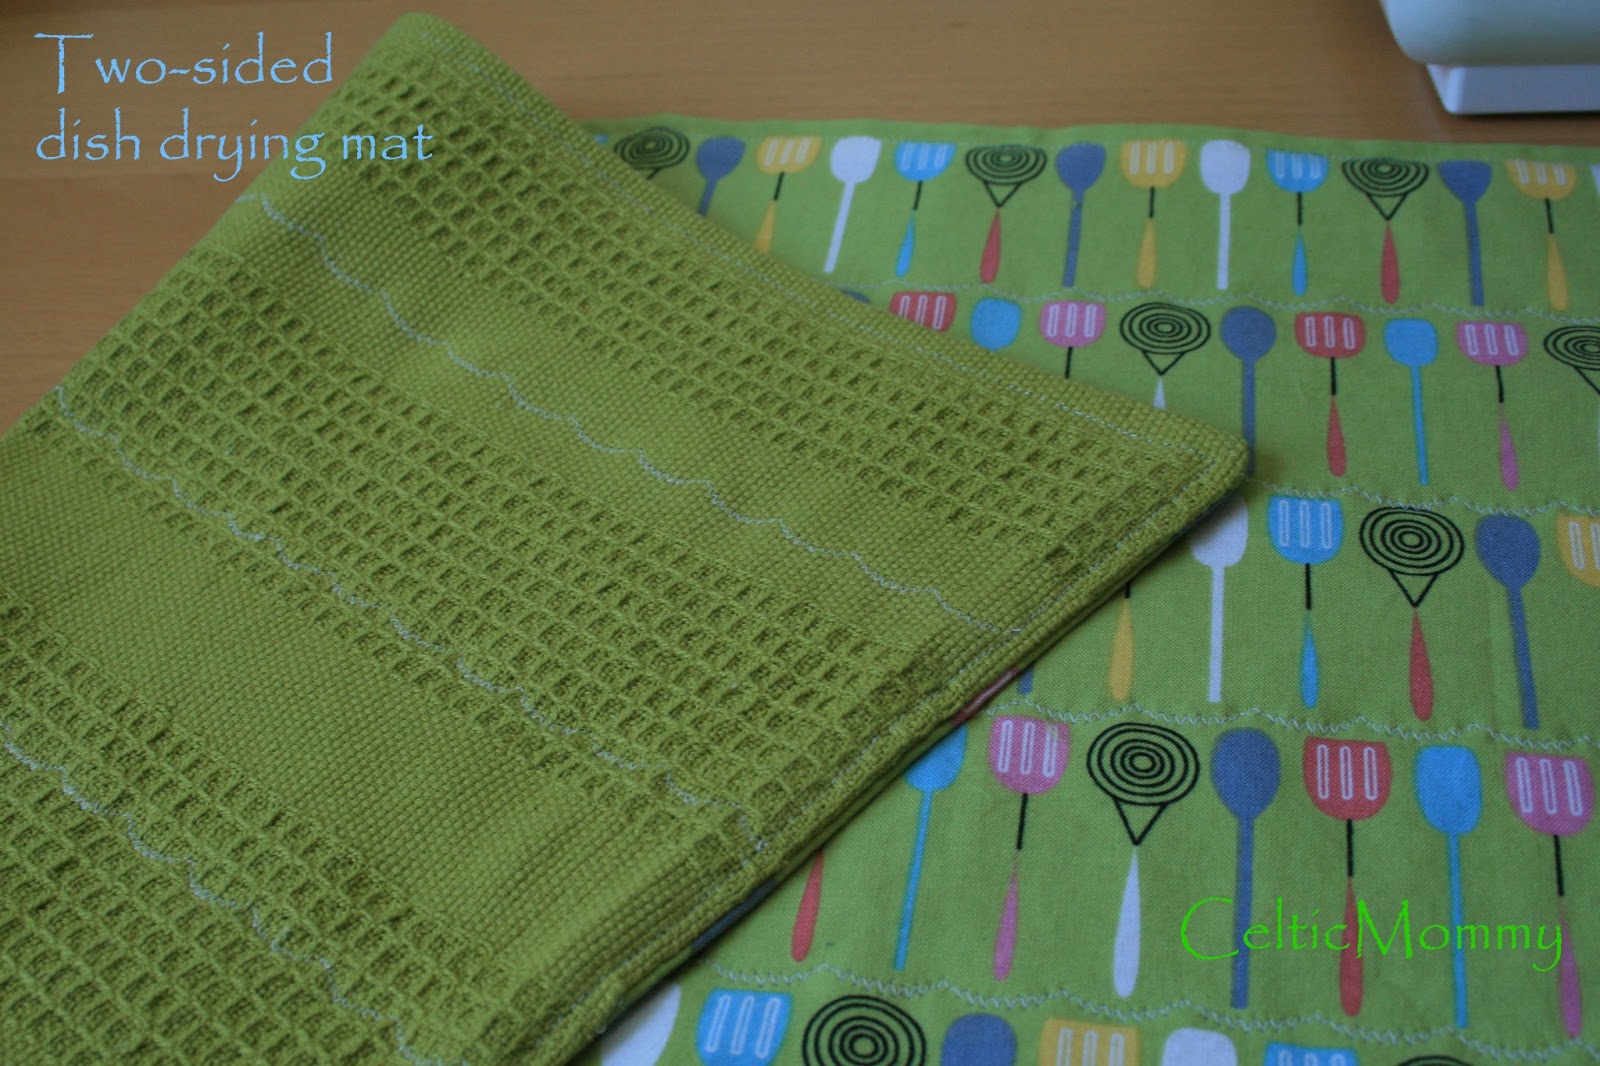
Repeat process for a second mat and you're all set to recycle your old drying rack!  Though thick, these could still be used as a dish towel as well.


If you make your own dish drying mat, please let me know!  Leave a link to your photos or blog in the comments so I can see your handiwork.

Happy Making!!
Hettie

Saturday, July 13, 2013

A crafty weekend

It's a crafty kind of weekend at our home.  We've each been busy crafting around one another all afternoon.  Rob is working on putting electricity in the treehouse while Em and Ro make duck tape boats and glue craft sticks together to make "lantern" decorations for the treehouse.  Wilson has been keeping me company while I cut rectangle after rectangle of fabric for Ro's new quilt.  Bits of fabric from years past and miles away will all hopefully combine into the right blanket of love for my sunny and energetic seven year old.  


The iron is hot, the tea is tasty, and my rectangles are piling up.  More details soon but you can click the photo if you want to see fabric detail-- it's pretty big.
Happy Weekend!  -Hettie

Friday, July 12, 2013

PYO Berries

At the beginning of summer, Em and Ro came up with a list of 60+ things they had to do this summer.  Some of them are easy to do at home:  learning to set the table, making ice cream, make popsicle stick creations, paint t-shirts, etc.  Some of them are field trip type of activities:  stargazing at the park, hiking at Tree People, catching fireflies, picking berries at a farm...


Yesterday, we ticked off "picking berries at a farm".  It was a beautifully overcast day, perfect for being out in the berry fields.  We quickly ate breakfast and made our way to Somis where the Underwood Family Farm is... just a few miles West of the San Fernando Valley.  We said hi to the sleepy goats and made our way to the back of the blueberry fields.


The bushes are netted to prevent the birds from eating the berries, but there were plenty to be had.  We passed just one other momma with her munchkins so we had the rows and rows of blueberry bushes pretty much to ourselves.  I loved the quiet way Em and Ro weaved in between the bushes commenting to each other that this bush was the best so far.  No, it's this bush, really.  No, this one!


After blueberry satisfaction was had, we made our way to the raspberries.  "Wow Mom, it's like we're in another world here... I can't hear anything above the buzzing of the bees!!  Incredible!",  Em exclaimed.  And it was.  Ro talked low and slow to each bee he passed "enjoy the raspberries little bees... here's a pretty flower for you."  (Can you spot the bees in the below photo?  It will enlarge if you click on it.)


Despite being close to the highway, it was quiet and relaxing.  Em and Ro contemplated each berry they picked.  The rich perfume of flowers and ripe fruit kept us grinning throughout the morning experience.  Eventually, we had enough berries and made our way back towards the farm market to buy our pickings.


I can't wait to go back in a month or so for the blackberries and to grab a jar of the local farm honey.


I hope you all have a lovely weekend!
Hettie

Wednesday, July 10, 2013

Morning Tea Time

Before the day blooms into another hot day.
Before the boys are up and ready for any and everything.
Before all the wonderful craziness, I make time for morning tea.

Outside, on my wee front patio, I sit.  With Harry Connick, Jr. crooning from my phone, I look out at the day.  By my side. a book to peruse and oolong tea from a great friend to sip.  I watch my neighbors walk their dogs and wave as they pass by.


Too quickly, Em and Ro are up and wanting first breakfast.  I better get out there now before they wake!
Happy Wednesday, Hettie

Monday, July 8, 2013

At the Nursery

In the San Fernando Valley, nurseries follow the power lines near Wilbur Avenue (and sometimes the storm drains) North-South, from Ventura Boulevard in Tarzana, up through Reseda and Northridge before veering right near the railroad tracks above Plummer Street.  The power lines and the nurseries continue up a Northeasterly path into Granada Hills before making a sharp right following along the 118 Freeway.  If we've ever needed plants, these are often the places to look for Valley homeowners seeking decent prices and good advice on what can survive the 110 degree summer days.


This past weekend, Rob, Em, Ro and I took a trip to one such nursery that had been recommended by friends for good plants and good advice.  While Rob talked plants with an employee, the boys and I went back and forth looking at baby fruit trees, admiring backyard chicken coops that butted up against the nursery, found treasures, followed butterflies, and got dusty.


Bees were lazily flittering about between lavender bushes and, nearby, a baby goat laid in the shade near its' momma trying to beat the heat.


To beat the heat ourselves, we followed the section specified for shaded plants for a bit.  The collection of pallets that made up the floor were sun bleached but strong.


Rob called me over to confer about plants... we bought a few varieties of lavender, more bushes, a fast growing vine for a sun wall and headed home.  Soon I'll have progress pics.


Incidentally, I have not forgotten about my promise of a meal done entirely on the BBQ... we had a few last-minute dinner dates with family.  So, watch for the BBQ post this week.
Happy Monday Everyone!  -Hettie

Saturday, July 6, 2013

The Picnic Blanket

So, umpteen years ago, I saw this lovely and easy-to-make blanket from SouleMama and filed it away in my crafting to-do notebook.  In my notebook I wrote "use 1/2 yards various for front, flat sheet for batting, remnants for back, looooong ties, triangles for rocks to weight down".  And there that snippet with a small drawing sat.  And sat, and sat.

Last April/May with the surgeries keeping me home resting while Em and Ro were at school, I took out that notebook and looked at my plans for a blanket once again.  Having finished a twin-sized crochet blanket for the couch while I was recuperating and sleeping many hours away, I wanted to get the sewing machine out and do something else.  I could sit for longer stretches of time without being too tired and sore so sewing would be easier.  I got out a fabric bundle coordinated by the lovely owner of Fabricworm, and starting arranging and rearranging them.  Over and over they moved until I thought I found the right fabric flow.


For the front, I used ten fabrics.  Each rectangle is an 18 x 44" (a 1/2 yard cut) piece before washing and sewing.  I sewed the left and right fabrics together and then matched the seams to sew each of the five pieces to one another.  I made the ties with 2  2 1/2 x 44" strips for each tie.  They are placed as you can see in the below photo in the center of one side of the picnic blanket (also see top photo) so that it can be folded down  small to wrap, tie and be carried by a munchkin.


The back is made up of 5 easy yards of darker colored coordinating fabrics sewn together with a center seam similar to the front. I didn't use lighter colored fabrics since the back will get dirty from grass, sand, and dirt.  In the center is a cotton, queen-sized flat sheet.  It is much lighter and thinner than batting but still gives good weight to the blanket.  Once the front pieces were done, I took them outside to pin together to sew.


As you can see in the top photo, the picnic blanket is on my front lawn.  I sewed all the way around, leaving a foot-long opening to turn the blanket right-side out.  Then, I top stitched along the edges and seams to keep everything in place.  I left out the triangles for weighting the picnic blanket down since it's pretty weighty all by itself.  Done and done!


We use the blanket everywhere we go now.  From Summer Concerts-in-the-Park to the beach and back to our front lawn for dinners outside.  The blanket is large enough for six people plus food and a book or two to read while laying and lazing about.  Em and Ro especially love the fabrics I chose because they are full of "boy things" like bugs and cars.  I love it because it brings us together.


Thursday, July 4, 2013

Happy Independence Day


Our flag hangs today, like it does every day, with pride and thankfulness for our freedom.
Happy Independence Day to my fellow Americans.  
I hope you have a safe and loving holiday!

Wednesday, July 3, 2013

Recipe: Vanilla Ice Cream with Shaved Chocolate

While it is happily cooling down a bit here in Los Angeles, it's still hot.  We often spend our afternoons indoors crafting and making things in the kitchen to pass the heat of the day away.  Sometimes recipes come out of it, like this day, and I hope you love it as much as we do!

Vanilla Ice Cream with Shaved ChocolateRecipe Makes 1 quart of heavenly frozen fare


Ingredients:
1 1/2 cups organic whole milk
1 1/2 cups organic heavy cream
2 large fresh, cold eggs (see note 1)
3/4 cup granulated sugar
1 Tablespoon Vanilla (see note 2)
A smidge of sea salt - you know, what you can grab with your thumb and finger
3/4 cup dark chocolate, shaved

Ice cream maker of your choice.

Note 1:  This is an uncooked ice cream.  If you are squeamish about consuming raw eggs, you can buy pasteurized eggs such as Safest Choice Pasteurized Eggs, you can pasteurize them yourself, or you can use them as is.  The eggs should be very fresh and very cold.  I used fresh organic eggs from my grocer and did not pasteurize them.

Note 2:  If you have Tahitian Vanilla, I would recommend using it as the aroma and flavor is amazing.  If you have Madagascar Vanilla Bean Paste, I would also recommend using that as the taste is wonderful and the little bean specks are fun.  If you have neither, use what you have as long as it is real vanilla.  I've made this with Tahitian Vanilla and Madagascar Vanilla Bean Paste because I had them on hand (and I'm not paid to say that, FYI).

Directions:

  • Using a bread knife if you have one, shave the chocolate slowly into fine pieces.  Measure and set aside.  Lick fingers.
  • In a large bowl, whisk the eggs until they are light and fluffy-- about 3 minutes.  Add vanilla and sugar slowly to combine.
  • Add salt, heavy cream, and whole milk, and blend again.  Cover and let chill in the fridge for at least an hour. 
  • Make the ice cream according to your ice cream maker instructions.  In the last 5 minutes, add shaved chocolate.  Transfer to a container and freeze to harden.  
If you want to eat it immediately, the ice cream will be soft and delicious.  The photos above and below are after the ice cream chilled for an hour in my freezer.  I used one of my loaf pans because it is much easier to scoop from.  As Ro said, "It smells yummy Momma!"  


If you want to make Mint Ice Cream with Shaved Chocolate, decrease the vanilla to one teaspoon and add one teaspoon of peppermint extract.  Happy Making!
Hettie