Sunday, October 30, 2011

A handmade Halloween

I apologize for being MIA, but Halloween has sorta taken over our house!!

Here's a few quick pics of what we've been up to.  I promise a fence tutorial among other things next week.


HAPPY HALLOWEEN!!!

Saturday, October 15, 2011

How to make custom oval necklaces


I was strolling through the pages of one of my favorite "Buy Handmade" sites a few months ago and came across these beautiful oval cabochon necklaces.  I saw prices ranging from $8.00 up to $30.00.  Thirty dollars!?!  No, I'm not paying that when I am sure I can make them myself for less.  These necklaces are customizeable with pretty much any image you can imagine and I am excited to be able to give you this tutorial complete with where to find all of the supplies to make them at home in an afternoon!  While the tutorial highlights one particular shape and size, you will find that size and shape can also be chosen to suit your own taste.

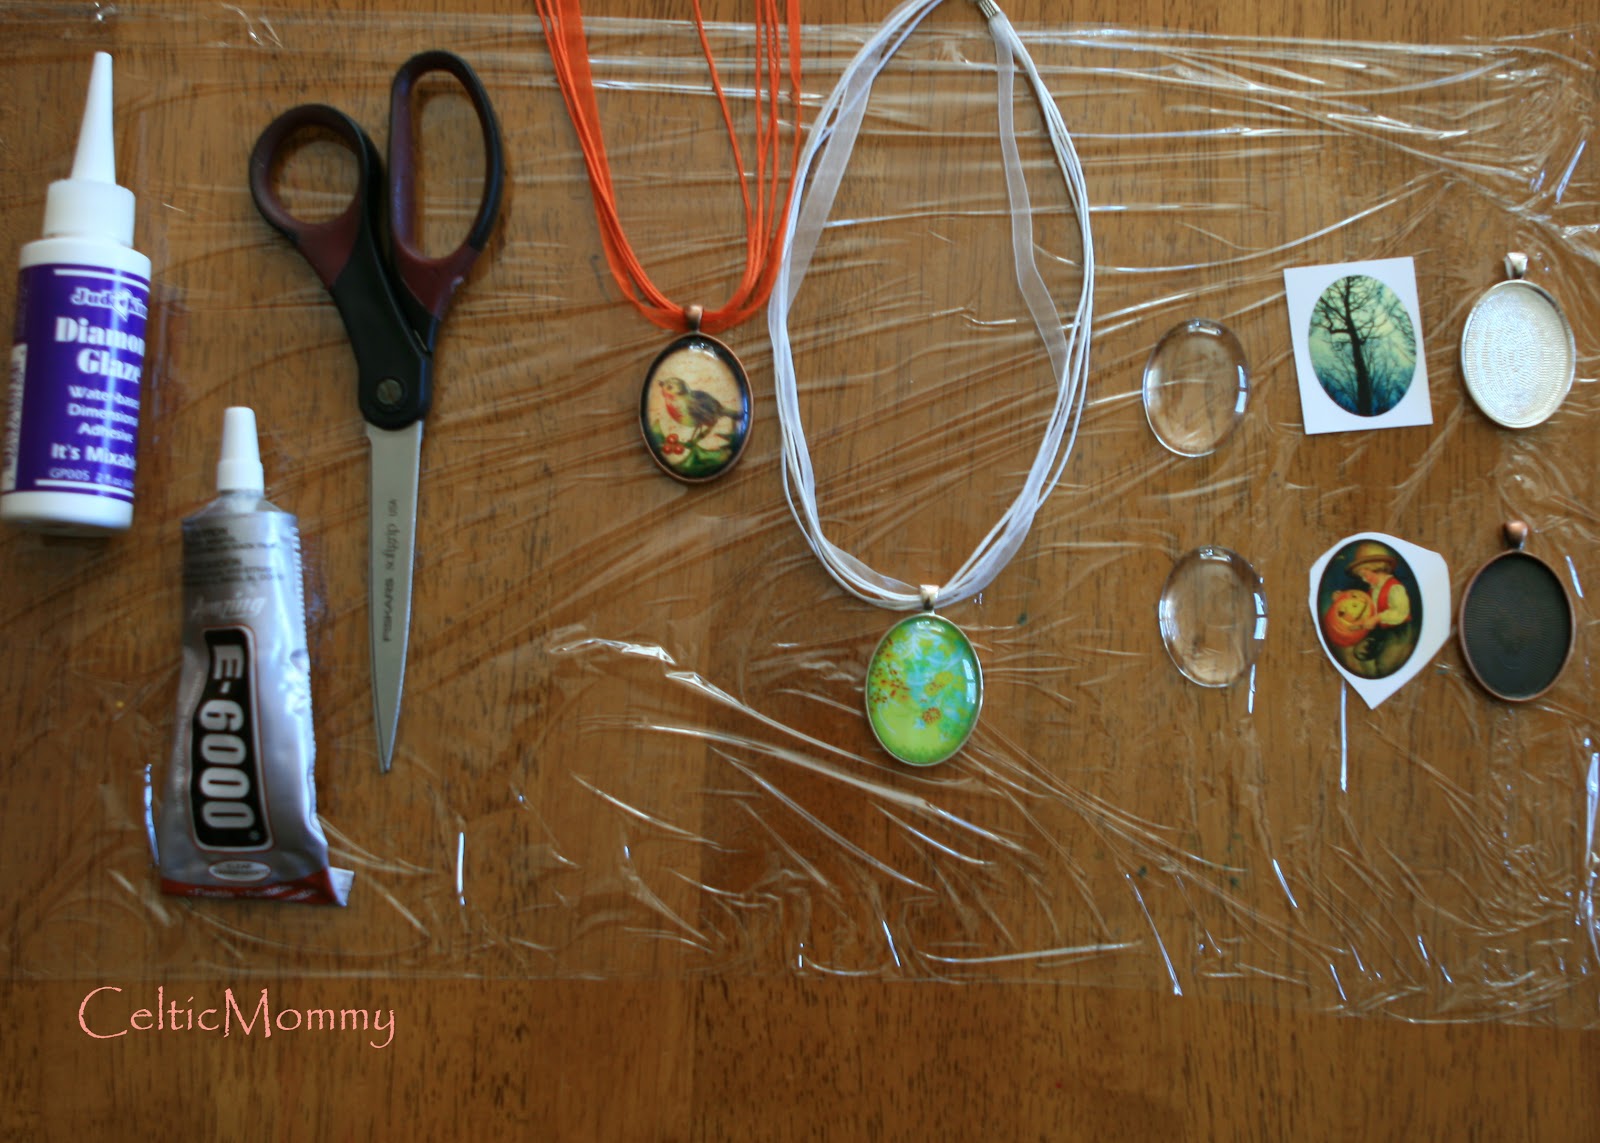
Gathering your supplies

From Left to Right:  Saran Wrap to protect your surface, JudiKins Diamond Glaze, E6000 adhesive, Sharp scissors, Finished necklaces, Glass Cabochons, Images printed on cardstock, Silver and Copper Metal Trays

Step One:
Cut your image so that it fits inside the metal tray.  Depending on the person you purchase your images from, they could fit perfectly, or use some shaving off a bit.  Take your time to get it right.  Once it fits, carefully take it out and prepare to glue the glass cabochon on to the image.  Make sure the glass is fingerprint free.

Apply a dime to nickle-sized amount of the JudiKins Diamond Glaze directly to the surface of the image.  Don't worry about bubbles, they will move.  Gently press and hold the glass onto the image, centering it exactly.  Hold cabochon in place for about 30 seconds while the glaze sets.  There will be glue on the sides squeezing out... that's okay.  Leave alone for about 2 minutes.
Step Two:
Carefully flip the cabochon upside down and move to a clean part of the Saran Wrap.  You can gently wipe the excess glue from the sides with a paper towel.  Don't worry about any glue on the back.  At this point, if you try to move your image, it will get ruined.  Leave alone for another 2 minutes.

Step Three:
Place E6000 adhesive directly in metal tray, taking care not to get close to the edges of the tray.  Once you press your cabochon/image in, the excess glue will seep out.  You can use a warm damp (NOT WET) paper towel to get the excess glue off now.  Or, you can wait an hour or so and it will be a bit hardened and peel-able   Personally, I prefer to remove the glue while still wet but you need to be very careful not to let excess water from the damp paper towel seep underneath and ruin your image.
Press and hold the cabochon in place for at least 30 seconds and then let dry for one hour.

Step Four:
Wear with pride!!  You could also make matching earrings with smaller ovals/images.  The possibilities are limited only to your imagination.

Here is a list of everything I purchased including links to them all.

JudiKins Diamond Glaze, you can but it on Etsy and many other online craft sites.  I purchased mine from the same seller as the cabochons, necklaces and metal trays to save on shipping.
E6000 Adhesive can be bought at Michael's, online, Lowe's and Home Depot.
The oval 30x40mm sized glass cabochons, metal necklace trays and ribbons were all purchased from CandyTiles2 on Etsy.  Candy always seems to have the best prices and ships quickly.  She will also do custom listings for you if you do not see what you want.  (This is my personal opinion and I'm not paid to say it, FYI.)
The images I used were purchased from:
Vintage Halloween Images:  Passion Fruits Images on Etsy
Cute Birdies & Flowers:  Piddix on Etsy
Trees and Artwork Images:  Kool Jewelry on Etsy
Japanese Patterns:  Groovy Graphics on Etsy
French Patterns:  Kitbiju on Etsy

After purchasing, I printed them at Kinko's on cardstock.

If you want to see how these look as magnets, please check out my other tutorial as well.

Happy Crafting!
Hettie
The glue:  

Wednesday, October 12, 2011

Lickety Split Potatoes are Terrific


I had everything set for dinner... turkey meatloaf, baked potatoes and roasted carrots.  Yummy.

Only one thing prevented me from actually making this dinner and that was the 98 degree temperature outside!  So much for that! Scanning my food supplies, I spied a bag of Terrific Trio potatoes and changed up my menu so that we could still have a tasty dinner minus heating up the oven and the whole house.  I nixed the roasted carrots for a cool salad, set my meatloaf in the BBQ and got started on the Lickety Split Potatoes.  They're fast and tasty-- and terrific, just like their namesake promised they'd be!

Lickety Split Potato Recipe

Ingredients:
1 bag of Terrific Trio potatoes (available at Ralph's), 1.5 pounds
1/4 cup olive oil
1 tsp. salt
1/2 tsp. pepper
1 tsp. dried basil (or fresh, chopped)
1 tsp. dried parsley (or fresh, chopped)
1 tbsp. dijon mustard

Since the potatoes come washed, this recipe works up super fast!
Cut the pretty red, yellow and blue potatoes in half and set aside.
In a large bowl, whisk together the olive oil, salt, pepper, basil, parsley and mustard until thoroughly blended, similar to a dressing.
Add potatoes and toss well to coat.
Place potatoes and marinade on the right side of a piece of tin foil, about 18 inches long.  Fold left side of tin foil over and close securely.  Cut two slits in top of tin foil and place on a medium-flamed BBQ.
BBQ for 30 minutes.  Alternately, you can bake these in your oven for 30 minutes at 375 degrees.
Take tin foil pouch off of BBQ and let rest 5 minutes before opening and serving.

These potatoes BBQ beautifully, giving off a heady hickory aroma.  Each potato still retains it personality despite being cooked together.  The purple potatoes are sweet, smooth and aromatic.  The red potatoes are a bit firmer to the bite but still smooth.  The yellow ones with the wonderful thin skin are dense and meaty.  Em and Ro gobbled these up and loved talking about the differences of each variety.

I've already been back to Ralph's Grocery Store for another bag of this Terrific Trio and also the Piccolo potatoes from The Little Potato Company.  I hope you enjoy making and eating them as much as we do!

Saturday, October 8, 2011

Spideriffic Welcome Banner

While wandering around Michael's a few weeks ago, I came across some cute, thin wood spiders.  I thought they would be perfect for making a little welcome sign to put on the front door.  And, at $ .20 a spider, it's economical too!  So, here's how I did it in an afternoon.


I took the wood spiders and painted both sides with a flat black acrylic paint I had on hand and let them dry for about 30 minutes.  The thin wood soaked the paint up quickly.


Using a green paint I also had in the house, I started to paint the letters on, but it looked a little boring.  Glitter to the rescue!  While the paint was still wet, I applied the glitter directly on top and let the spiders dry.


Once all the letters were done, I lined them up on a piece of plastic wrap and glued each spider to a long strip of ribbon.  Since the spiders are so light, I put a little rock on top of each spider to weight it down while the glue dried.  Once dry, I looped the top section of ribbon so I could hang it on a nail.  An hour later, it was on my front door!  A fun and fast decoration for the cost of just the seven spiders:  $1.40!!  Everything else I had on hand.  We also bought a bunch of wooden pumpkins, ghosties and witches hats, but that's a craft for another day.

I hope you are having a wonderful weekend!
Hettie